读懂 go 的 panic 信息

概述

作为一个经常写 go 的程序员,肯定时不时会看到 go 的 panic 信息。一般我们都可以根据信息轻松定位到出错的代码行数,但也因为这个原因,往往忽视了其他的一些信息。这篇文章主要来分析,go 程序 panic 时输出的错误信息到底如何理解?

例子分析

下面我们先用一个非常简单的例子来说明:

package main

import (
    "fmt"
)

type Person struct {
    name string
    age  int
}

func (person *Person) say(words []string) (ret int) {
    for i := range words {
        ret++
        fmt.Printf("%s say: %s", person.name, words[i])
    }
    return
}

func main() {
    var person *Person
    words := []string{
        "hello",
        "world",
    }
    person.say(words)
}

这个例子一运行就会 panic,信息如下:

panic: runtime error: invalid memory address or nil pointer dereference
[signal SIGSEGV: segmentation violation code=0x1 addr=0x8 pc=0x493373]

goroutine 1 [running]:
main.(*Person).say(0x0, 0xc000072f58, 0x2, 0x2, 0x0)
    /home/jiangpengfei.jiangpf/projects/panic_demo/main.go:15 +0x43
main.main()
    /home/jiangpengfei.jiangpf/projects/panic_demo/main.go:26 +0x7d
  1. panic: runtime error: invalid memory address or nil pointer dereference。这句话表面了这是一个 panic 异常,并且可能原因是无效的内存地址或空指针的解引用

  2. [signal SIGSEGV: segmentation violation code=0x1 addr=0x8 pc=0x493373]SIGSEGV 当一个进程执行了一个无效的内存引用,或发生段错误时发送给它的信号。0x1对应的是SEGV_MAPERR,也就是指地址未找到对象addr0x8,这并不是一个有效的内存地址。pc是程序计数器,用来指向下一条指令存放的位置。

  3. goroutine 1 [running]1是 goroutine 的 ID。running代表该协程在发生异常时的状态。

  4. main.(*Person).say(0x0, 0xc000072f58, 0x2, 0x2, 0x0)main是 package,(*Person)是类型,say是方法,我们可以看到,say 的调用共有 5 的参数。但代码中,say 的调用其实只有 1 个参数。其实呢,

    1. 第 1 参数是 receiver,这里就是 *Person。值为 0x0说明它是一个空指针。
    2. 第2~4个参数是 []string,我们都知道,slice 这个数据结构是有三个字段组成:pointer, len, cap。pointer(0xc000072f58) 是指向实际内存地址的指针,len(0x2) 是长度,cap(0x2) 是容量。
    3. 第 5 个参数是返回值。
  5. /home/jiangpengfei.jiangpf/projects/panic_demo/main.go:14 +0x43。这里标出了出错的代码位置以及行号。+0x43 又代表什么含义呢?说实话我没有搜索到相关的信息。但是找到了如下的 go runtime 的代码[go/src/runtime/traceback.go:439]。frame 代表当前栈帧,f 代表当前函数,entry 是该函数的 start pc。因此可以知道 +0x43 代表的是栈内的 pc 偏移量。
    if frame.pc > f.entry {
    print(" +", hex(frame.pc-f.entry))
    }
    

至此,一个简单的 panic 例子分析完毕。但是这里我们还有两个没有说明白的事情。

  1. panic 时的参数到底如何分析,比如上面说到 slice 类型的参数在 panic 时,会输出 pointer, len, cap 这三个信息。其实也就是,panic 中会输出 go 类型的内存布局信息。那么对于其他的类型又是什么样子的呢?
  2. panic 时,go runtime 是如何做到收集并打印出上述的所有信息呢?

go 类型的内存布局

这一部分主要参考:Go Data StructuresGo Data Structures: Interfaces。大家也可以直接看这两篇文章。

基本类型
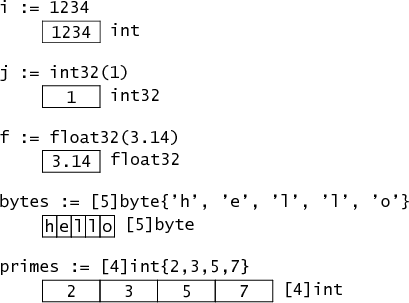
basic type

基本类型的内存布局很好理解,不多阐述。

结构体和指针

结构体的内存布局是按照成员变量的顺序来的。当然,还会有一些内存对齐的优化,不过不属于本篇文章的范围。

比如下面的 Point 结构体。

type Point struct { X, Y int }

其内存布局如下:。

struct and pointer

对于成员变量非基本类型,内存布局如下:

type Rect1 struct { Min, Max Point }
type Rect2 struct { Min, Max *Point }
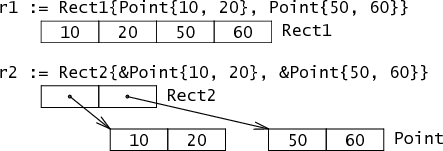
struct and pointer

字符串

string

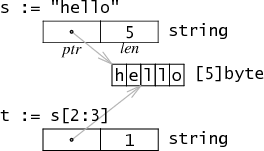
字符串主要由:pointer 和 len 组成,其中 pointer 指向 byte 数组的内存首地址。同时,go 中的 string 是不可变的,因此多个字符串共享同一块内存区域是安全的。

切片

slice

slice 也是引用到数组的一块内存地址上,由三个字段组成:pointer, len 和 cap

interface

(下面是基于 32 位机器而言)

type Stringer interface {
    String() string
}

func ToString(any interface{}) string {
    if v, ok := any.(Stringer); ok {
        return v.String()
    }
    switch v := any.(type) {
    case int:
        return strconv.Itoa(v)
    case float:
        return strconv.Ftoa(v, 'g', -1)
    }
    return "???"
}
type Binary uint64

func (i Binary) String() string {
    return strconv.Uitob64(i.Get(), 2)
}

func (i Binary) Get() uint64 {
    return uint64(i)
}

上面定义了 Stringer 类型,Binary 实现了 Stringer 类型。

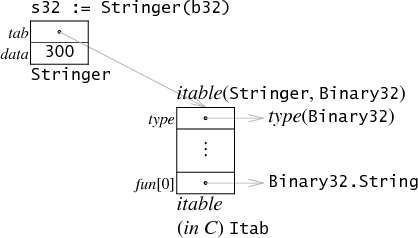
那么,图中 b 的内存布局如下。将 b 做类型转换成 s 后,内存布局如下:
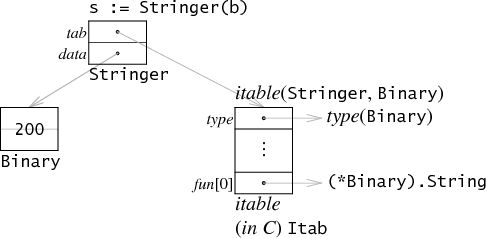
这里,tab 指向了一个 itable

  1. itable 中的 type 指向了底层类型(Binary),因此 s.tab->type 就可以获取该 interface 的类型。
  2. itable 的 func 数组中只保存实现了 Stringer 的方法指针。所以 Get() 并不会保存在这里。
  3. 在调用 s.String() 时,等同于调用 s.tab->func[0](s.data)。将 s.data 作为第一个参数,传进函数调用中。这里还需要注意一点,因为函数调用传进去的是 s.data,而 s.data 的类型是 *Binary。因此 func[0] 是 (*Binary).String 而不是 (Binary).String

data 是一个指针,指向了 Binary(200)。需要注意的是,这里并不是指向了原始的 b,而是 b 的拷贝。

当然,并不是所有情况都如此,比如说,如果将 b 转换成一个没有方法的 interface,这里就可以对内存做一下优化。
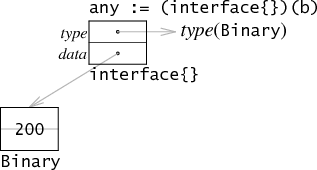
此时,因为没有 func 列表,所以就不要单独为 itable 在堆上分配一块内存了。any.type 直接指向一个类型就可以了。同样的,如果 data 正好是 32位(和机器的寻址大小一致),那么也可以通过直接将值保存在 data 中来进行优化。
下面是两种优化都可以享受的情况:

参数更多的例子分析

在了解到上述的 go 类型的内存布局之后,下面看一个更多参数的函数调用 panic。

package main

//go:noinline
func test1(a int, b []int, c string, d [2]int64) error {
    panic("test1")
}

func main() {
    a := 0
    b := make([]int, 3, 7)
    b[0], b[1], b[2] = 1, 2, 3
    c := "c"
    d := [2]int64{5, 6}

    test1(a, b, c, d)
}

注意,这里使用了 //go:noinline 来防止 go 编译时对函数进行内联,这样 panic 后就会丢失参数信息。panic 信息如下:

main.test1(0x0, 0xc00003a740, 0x3, 0x7, 0x475848, 0x1, 0x5, 0x6, 0x4046eb, 0xc000058000)

解释如下:

main.test1(0x0, // a 的值
           0xc00003a710, // b 指向的内存地址
           0x3, // b 的 len
           0x7, // b 的 cap
           0x475a48, // c 指向的内存地址
           0x1, // c 的长度
           0x5, // d[0]
           0x6, // d[1]
           0x4046eb, // 
           0xc000058000) // error 的值

如果我们希望看到没有优化过的 error 值。可以使用下面的方式来运行:

go run -gcflags '-N -l' main.go

这样的话,最后两个参数就都是 0x0。再来一个和结构体相关的例子:

package main

type speaker interface {
    say()
}

type person struct {
    name string
    age  int
}

func (p person) say() {
}

//go:noinline
func test2(p1 person, p2 *person, p3 speaker) error {
    panic("test2")
    return nil
}

func main() {
    p1 := person{"p", 11}
    p2 := new(person)
    p3 := speaker(p1)

    test2(p1, p2, p3)
}

使用 go run -gcflags '-N -l' main.go 运行后 panic 信息如下:

main.test2(0x475a48, 0x1, 0xb, 0xc00003a748, 0x487200, 0xc00003a730, 0x0, 0x0)

解释如下:

main.test2(0x475a49, // person.name 指向的内存地址
           0x1, // person.name 的长度
           0xb, // person.age 的值
           0xc00003a748, // p2 的指针值
           0x487200, // p3 指向的 itable 中的 type
           0xc00003a730, // p3 指向的 p1 的拷贝的内存地址
           0x0, // error 的类型
           0x0) // error 的值

go panic 后的执行过程

goroutine 上发生 panic 后,会进入函数退出阶段。以手动调用 panic 为例。

  1. 首先,go runtime 会将该 panic 放到 goroutine 的 panic 链表首。
var p _panic
p.arg = e       // arg 是 panic 的参数
p.link = gp._panic // link 指向更早的 panic
gp._panic = (*_panic)(noescape(unsafe.Pointer(&p))) // gp 是当前 goroutine 协程
  1. 接着,会依次执行 goroutine 上的 defer。
    for {
        d := gp._defer
        if d == nil {
            break
        }
       ...
       ...
    }
    
  2. 如果该 defer 之前已经执行过了。则直接忽略该 defer
    // If defer was started by earlier panic or Goexit (and, since we're back here, that triggered a new panic),
    // take defer off list. The earlier panic or Goexit will not continue running.
    if d.started {
     if d._panic != nil {
       d._panic.aborted = true
     }
     d._panic = nil
     d.fn = nil
     gp._defer = d.link
     freedefer(d)
     continue
    }
    
  3. 执行 defer 对应的函数调用。
    reflectcall(nil, unsafe.Pointer(d.fn), deferArgs(d), uint32(d.siz), uint32(d.siz))
    
  4. 如果 defer 函数中遇到了 recover(),还会执行以下代码。当然,这里只会检查 recover() 调用是否有效
    1. p != nil。当前确实发生 panic 了。
    2. !p.recovered。当前的 panic 没有恢复
    3. argp uintptr(p.argp)。argp 是调用者的参数指针,p.argp 是 defer 的参数。
    4. 如果上述条件之一不满足,就返回 nil,表示这个 recover() 是无效的。
    func gorecover(argp uintptr) interface{} {
    // Must be in a function running as part of a deferred call during the panic.
    // Must be called from the topmost function of the call
    // (the function used in the defer statement).
    // p.argp is the argument pointer of that topmost deferred function call.
    // Compare against argp reported by caller.
    // If they match, the caller is the one who can recover.
    gp := getg()
    p := gp._panic
    if p != nil && !p.recovered && argp == uintptr(p.argp) {
        p.recovered = true
        return p.arg
    }
    return nil
    }
    
  5. 上一步虽然是 recover() 调用,但并没有 recover 的逻辑,只是给当前 panic 标记了 recovered=true。所以可以执行到下面这个判断。通过 mcall(recovery) 来执行真正的恢复逻辑。
    if p.recovered {
            atomic.Xadd(&runningPanicDefers, -1)
    
            gp._panic = p.link
            // Aborted panics are marked but remain on the g.panic list.
            // Remove them from the list.
            for gp._panic != nil && gp._panic.aborted {
                gp._panic = gp._panic.link
            }
            if gp._panic == nil { // must be done with signal
                gp.sig = 0
            }
            // Pass information about recovering frame to recovery.
            gp.sigcode0 = uintptr(sp)
            gp.sigcode1 = pc
            mcall(recovery)
            throw("recovery failed") // mcall should not return
    }
    
  6. 恢复实现如下
    // Unwind the stack after a deferred function calls recover
    // after a panic. Then arrange to continue running as though
    // the caller of the deferred function returned normally.
    func recovery(gp *g) {
    // Info about defer passed in G struct.
    sp := gp.sigcode0
    pc := gp.sigcode1
    
    // d's arguments need to be in the stack.
    if sp != 0 && (sp < gp.stack.lo || gp.stack.hi < sp) {
        print("recover: ", hex(sp), " not in [", hex(gp.stack.lo), ", ", hex(gp.stack.hi), "]\n")
        throw("bad recovery")
    }
    
    // Make the deferproc for this d return again,
    // this time returning 1.  The calling function will
    // jump to the standard return epilogue.
    gp.sched.sp = sp
    gp.sched.pc = pc
    gp.sched.lr = 0
    gp.sched.ret = 1
    gogo(&gp.sched)
    }
    
  7. 如果没有恢复逻辑的话,就执行到输出异常信息的地方了。
    // ran out of deferred calls - old-school panic now
    // Because it is unsafe to call arbitrary user code after freezing
    // the world, we call preprintpanics to invoke all necessary Error
    // and String methods to prepare the panic strings before startpanic.
    preprintpanics(gp._panic)
    
    fatalpanic(gp._panic) // should not return
    
  8. preprintpanics 负责准备要打印的信息。即如果 panic 参数是 error,就从 v.Error() 中获取错误信息。如果参数实现了 stringer,则调用 String() 来获取字符串信息。
    // Call all Error and String methods before freezing the world.
    // Used when crashing with panicking.
    func preprintpanics(p *_panic) {
    defer func() {
        if recover() != nil {
            throw("panic while printing panic value")
        }
    }()
    for p != nil {
        switch v := p.arg.(type) {
        case error:
            p.arg = v.Error()
        case stringer:
            p.arg = v.String()
        }
        p = p.link
    }
    }
    
  9. fatalpanic 开始最后的异常信息输出。首先递归调用 printpanics 来打印 panic 的参数。
    // Print all currently active panics. Used when crashing.
    // Should only be called after preprintpanics.
    func printpanics(p *_panic) {
        if p.link != nil {
            printpanics(p.link)
            print("\t")
        }
        print("panic: ")
        printany(p.arg)
        if p.recovered {
            print(" [recovered]")
        }
        print("\n")
    }
    
  10. 最后调用 dopanic_m 来打印异常调用栈,然后 exit(2)退出

一个kube config 管理工具-kubecm

kubecm

kubecm 全称是 kube config manager,主要用来管理 kube config 文件的。使用场景是在我们做 k8s 相关的开发时,有的时候会存在各种各样的集群环境,这时无论是从集群中获取 kubeconfig 文件,还是做 kubeconfig 文件的切换,都是非常麻烦的一件事情。

kubecm 可以方便的帮助你从多个途径导入 kubeconfig 文件并管理起来。你也可以使用 kubecm 来快速切换 kubeconfig。

项目在 github 上:https://github.com/joyme123/kubecm

image

安装

go get github.com/joyme123/kubecm

或者在这里找到二进制文件下载:https://github.com/joyme123/kubecm/releases

使用

列出所有的配置文件

kubecm list

导致配置文件

# 从本地文件系统中导入
kubecm import -n dev_129_cluster -l /tmp/configs/config_dev_182_cluster

# 通过带 password 的 ssh 导入。
kubecm import dev_0_101_cluster --from=ssh://root@192.168.0.101:/etc/kubernetes/kubectl.kubeconfig  -p mypassword

# 通过带证书的 ssh 导入,默认读取 $HOME/.ssh/id_rsa
kubecm import dev_0_102_cluster --from=ssh://root@192.168.0.102:/etc/kubernetes/kubectl.kubeconfig 

使用配置文件

kubecm use -n dev_129_cluster

重命名配置文件

kubecm rename -n dev_129_cluster -t dev_cluster

删除配置文件

kubecm remove -n dev_129_cluster

flannel 的多种 backend 实现分析

一、概述

flannel 是一个较简单的网络插件,其支持多种网络方案,可以使用 etcd 或者 k8s 作为存储,来实现 docker 或者 k8s 的网络。其支持的网络方案 backend 有:

  • hostgw
  • udp
  • vxlan
  • ipip
  • ipsec

同时也支持了多家云厂商的网络环境:

  • AliVPC
  • AWS VPC
  • GCE

下面会简单介绍 flannel 的工作原理,并主要就标准环境下的网络方案 backend 做分析。

二、flannel 网络方案

flannel 的部署文件中包含一个 configmap,其中包含 flannel cni 的配置文件,以及 flannel 需要的 cluster-cidr 和使用的 backend 配置。flannel 通过 daemonset 调度到每个节点上。flannel 的 pod 有一个 init 容器,负责将 configmap 中的 cni-conf.json 复制到宿主机上的 /etc/cni/net.d/10-flannel.conflist。之后 flanneld 启动,其拥有 NET_ADMINNET_RAW 的 capabilities。

这里需要注意的是,如果你的默认路由对应的网卡不是 node 使用的网卡(比如使用 vagrant 部署 k8s 时,虚拟机的 eth0 是默认的 nat 网卡,但是不用在 k8s 集群中),应该使用 --iface=eth1 来指定使用的网卡。

flannel 会根据 cluster-cidr 来为每个 node 分配单独的子网,这样就能保证不同 node 上的 pod ip 不会冲突。然后根据配置文件中不同的 backend 来注册网络。下面就开始简单分析不同 backend 的工作原理。其中

  1. IPIP 和 VXLAN 类似,不过 VXLAN 封装的是二层的帧,IPIP 封装的是 IP 包。这里不做分析。

  2. UDP 使用的很少,也不做分析。

  3. IPSEC 关注的是通信安全方面。不是这里关注的重点。不做分析。

为了方便后续的描述,这里先列举出整个集群的概况:

cluster cidr: 172.10.0.0/16

master: 192.168.33.101,子网是 172.10.100.0/24

node1: 192.168.33.102,子网是 172.10.0.0/24

node2: 192.168.33.103,子网是 172.10.1.0/24

2.1 host-gw

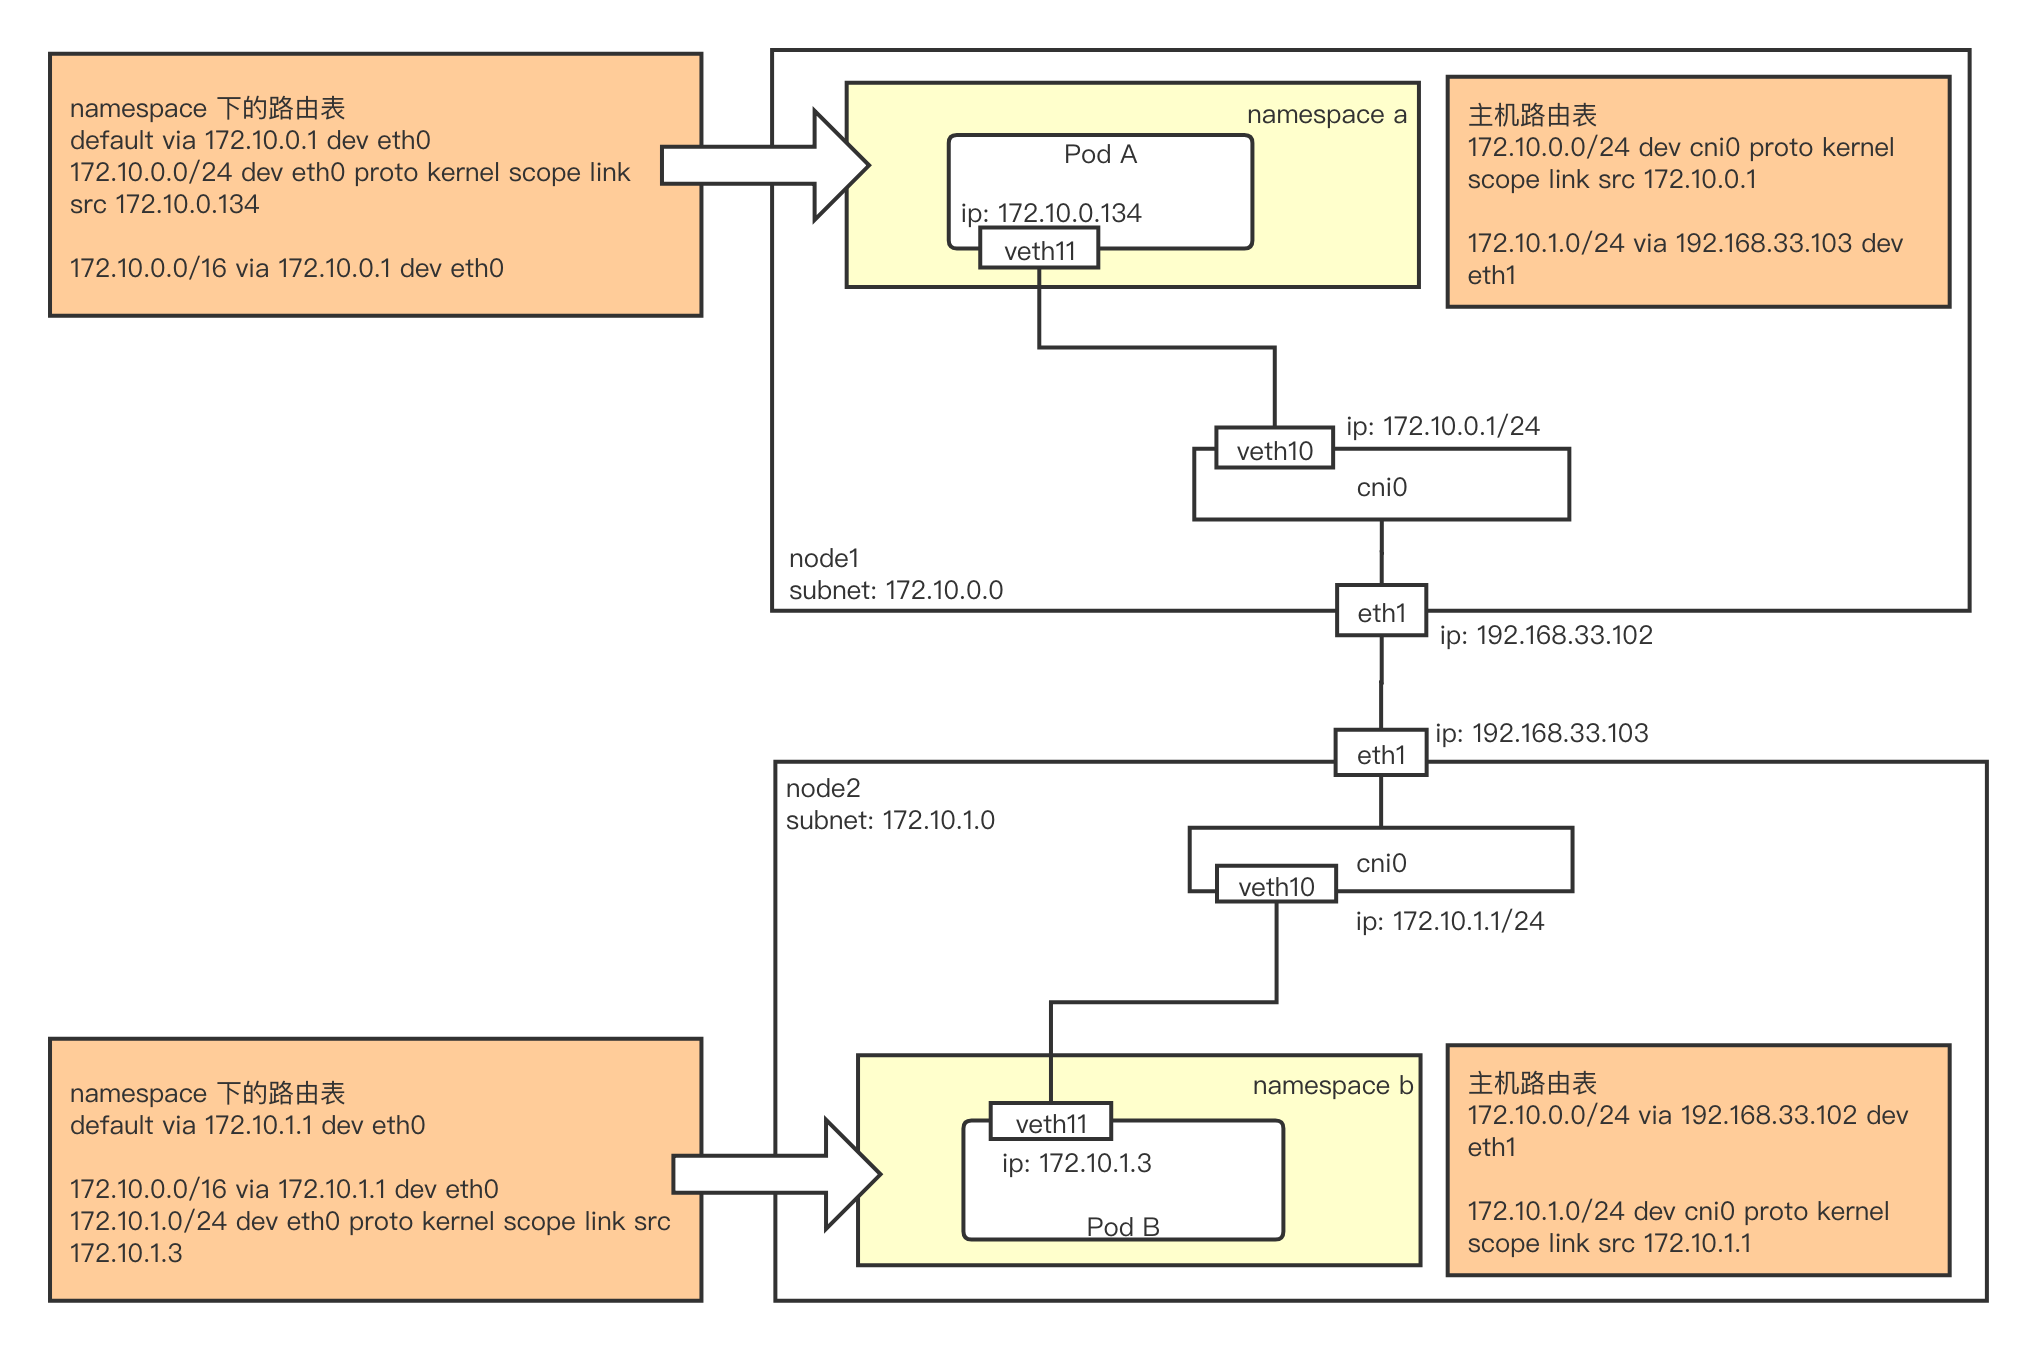
host-gw 是最简单的 backend,所有的 pod 都会被接入到虚拟网桥 cni0 上,然后它通过监听 subnet 的更新,来动态的更新 host 上的路由表。通过路由来实现不同 node 上的 pod 间通信以及 node 和 pod 间的通信。如下图所示:

flannel-hostgw

  1. Node1 上的 pod A(172.10.0.134) 和 node2 上的 pod B(172.10.1.3) 通信时,A 根据 namespace 下的路由规则default via 172.10.0.1 dev eth0将流量发往网关 cni0 到达宿主机。
  2. 根据宿主机路由规则 172.10.1.0/24 via 192.168.33.103 dev eth1 ,通过网卡 eth1 发往 192.168.33.103 这个网关,而这个网关正好是 node2 的 eth1 网卡 ip。
  3. node2 此时扮演网关的角色,根据路由规则 172.10.1.0/24 dev cni0 proto kernel scope link src 172.10.1.1, 通过 cni0 发送。使用 arp 找到目标 ip 对应的 mac 地址。将二层的目标 mac 地址替换成 pod B 的 mac 地址。将二层的源 mac 地址替换成 cni0 的 mac 地址。
  4. cni0 是个 bridge 设备。根据 mac 表来将流量从对应端口发送到 pod B 中。

因为通信过程的第 2 步需要将其他 node 作为网关,因此 hostgw 需要所有 node 二层互通。

2.2 VXLAN

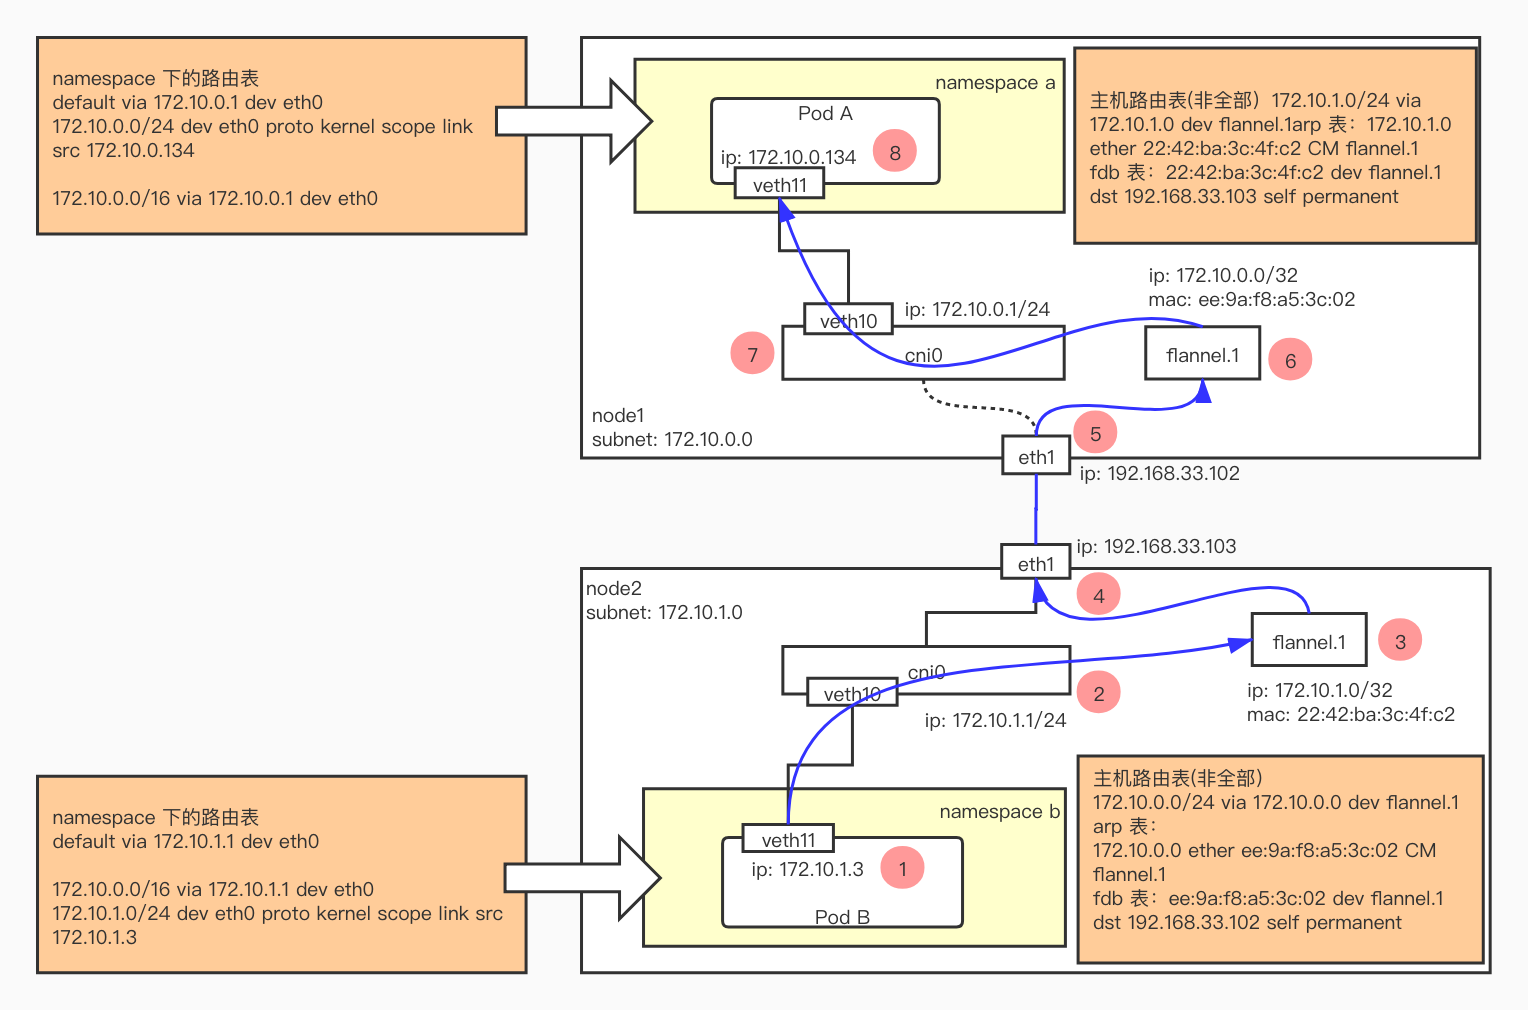
相比于 host-gw 必须要二层互通。VXLAN 是个 overlay 的网络实现,只需三层互通即可。在 flannel 的实现中,并没有使用 VXLAN 的全部能力,仅仅用它来做二层包的封装和解封装。其整个流程图如下:

flannel-vxlan

可以发现,相比于 host-gw,增加了 flannel.1 这个设备。这个 flannel 的进程在启动的时候创建的。同时它还会监听所有的子网,每个节点加入网络中,都会创建一个属于自己的子网。flannel 进程在监听到新的子网创建时,会在当前节点创建以下:

  1. 一条路由:172.10.0.0/24 via 172.10.0.0 dev flannel.1。172.10.0.0 的 IP 是其他节点的 flannel.1 地址。
  2. 一条 ARP: 172.10.0.0 ether ee:9a:f8:a5:3c:02 CM flannel.1。在包通过路由发出去前,需要知道 172.10.0.0 的二层地址。这时就会匹配这条 ARP 记录。
  3. 一条 FDB:ee:9a:f8:a5:3c:02 dev flannel.1 dst 192.168.33.102 self permanent。这条 FDB 记录会匹配二层的转发路径。

为了更好的理解 flannel 的 vxlan 实现,我们按照图中的步骤一步步分析。

  1. Pod B (172.10.1.3) 向 Pod A (172.10.0.134) 发送数据。因为 Pod A 和 Pod B 的 IP 不在一个子网,因此走默认路由表,发向 172.10.1.1。这个地址是 cni0 的地址,因此可以直接发过去。

  2. IP 包到达 cni0 网桥后,根据主机路由表 172.10.0.0/24 via 172.10.0.0 dev flannel.1,下一跳是 172.10.0.0,通过 flannel.1 发送。

  3. 此时需要知道 172.10.0.0 的 mac 地址,因此检查主机的 arp 表。发现 172.10.0.0 ether ee:9a:f8:a5:3c:02 CM flannel.1,因此要发送的帧如下:

    ethernet-frame

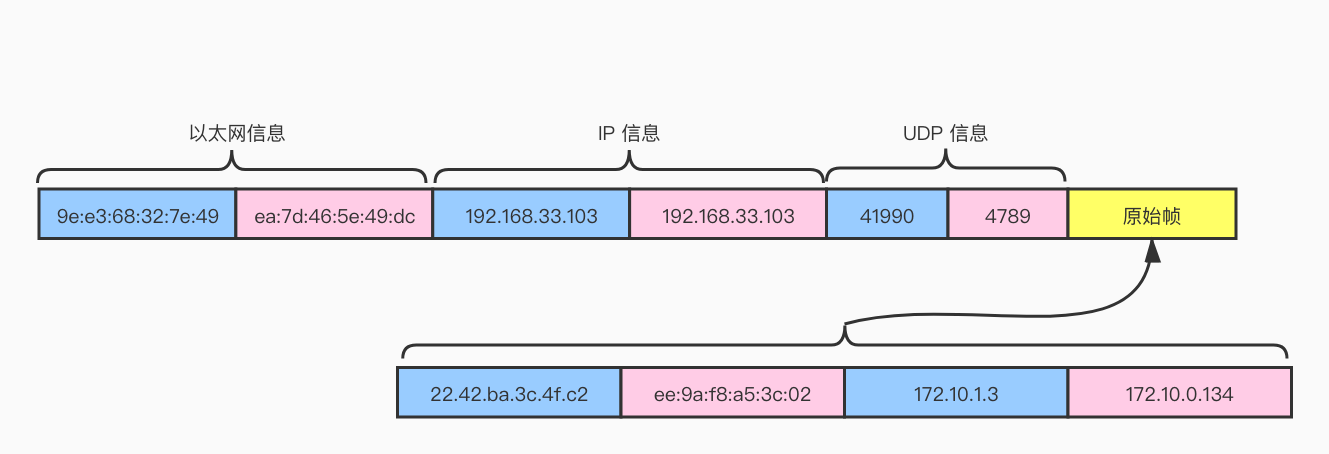
  4. 二层帧的转发需要查找主机的 fdb 表。这里匹配到 ee:9a:f8:a5:3c:02 dev flannel.1 dst 192.168.33.102 self permanent。封装成 vxlan 的包从 eth1 发出去。发出去的包如下:

    vxlan

  5. 对端的 eth1 网络收到包,发现是 vxlan,于是会对包解封装。二层地址是 flannel.1 设备的 mac 地址。因此发到 flannel.1 上。

    ethernet-frame

  6. 此时三层目标地址是 172.10.0.134,因此匹配主机的路由表 172.10.0.0/24 dev cni0 proto kernel scope link src 172.10.0.1。这个路由表没有写在上图中。

  7. cni0 和我们的 pod 是二层互通的。因此将包发给 pod。

  8. pod 收到包。三层的来源地址是 172.10.1.3,二层的来源地址是 cni0 的 mac 地址。

可以通过以下命令行,模拟整个流程。

# host1
br0_ip="10.20.1.1"
vtep_ip="10.20.1.0/32"
endpoint_ip="10.20.1.4/24"
sudo ip link add name br0 type bridge forward_delay 1500 hello_time 200 max_age 2000 vlan_protocol 802.1Q
sudo ip addr add br0_ip/24 dev br0
sudo ip link add name vtep0 type vxlan id 1 dev ens33 srcport 0 0 dstport 4789 nolearning proxy ageing 300
sudo ip addr addvtep_ip dev vtep0
sudo ip link add name veth0 type veth peer name veth1
sudo ip netns add n1
sudo ip link set veth1 netns n1
sudo ip link set veth0 master br0
sudo ip netns exec n1 ip addr add endpoint_ip dev veth1
sudo ip netns exec n1 ip link set veth1 up
sudo ip netns exec n1 ip route add default viabr0_ip dev veth1
sudo ip link set veth0 up
sudo ip link set br0 up
sudo ip link set vtep0 up

# host2
br0_ip="10.20.2.1"
vtep_ip="10.20.2.0/32"
endpoint_ip="10.20.2.4/24"
sudo ip link add name br0 type bridge forward_delay 1500 hello_time 200 max_age 2000 vlan_protocol 802.1Q
sudo ip addr add br0_ip/24 dev br0
sudo ip link add name vtep0 type vxlan id 1 dev ens33 srcport 0 0 dstport 4789 nolearning proxy ageing 300
sudo ip addr addvtep_ip dev vtep0
sudo ip link add name veth0 type veth peer name veth1
sudo ip netns add n1
sudo ip link set veth1 netns n1
sudo ip link set veth0 master br0
sudo ip netns exec n1 ip addr add endpoint_ip dev veth1
sudo ip netns exec n1 ip link set veth1 up
sudo ip netns exec n1 ip route add default viabr0_ip dev veth1
sudo ip link set veth0 up
sudo ip link set br0 up
sudo ip link set vtep0 up


# host1
host2_vtep_mac="f2:a4:1f:4e:5c:51"
host2_vtep_ip="10.20.2.0"
subnet_mask="24"
host2_ip="192.168.105.167"
# one route
sudo ip route add host2_vtep_ip/subnet_mask via host2_vtep_ip dev vtep0 onlink
# one arp
sudo arp -i vtep0 -shost2_vtep_ip host2_vtep_mac
# one fdb
sudo bridge fdb addhost2_vtep_mac dev vtep0 dst host2_ip

# host2
host1_vtep_mac="be:ae:0d:f3:da:77"
host1_vtep_ip="10.20.1.0"
subnet_mask="24"
host1_ip="192.168.105.166"
# one route
sudo ip route addhost1_vtep_ip/subnet_mask viahost1_vtep_ip dev vtep0 onlink
# one arp
sudo arp -i vtep0 -s host1_vtep_iphost1_vtep_mac
# one fdb
sudo bridge fdb add host1_vtep_mac dev vtep0 dsthost1_ip

# host1 and host2
echo "1" > /proc/sys/net/ipv4/ip_forward

# host1
ip netns exec n1 ping 10.20.2.4

apiserver 处理请求的过程

1. 概述

k8s 的 apiserver 作为所有组件通信的枢纽,其重要性不言而喻。apiserver 可以对外提供基于 HTTP 的服务,那么一个请求从发出到处理,具体要经过哪些步骤呢?下面会根据代码将整个过程简单的叙述一遍,让大家可以对这个过程由大概的印象。

因为 apiserver 的代码结构并不简单,因此会尽量少的贴代码。以下分析基于 k8s 1.18

2. 请求的处理链

// 构建请求的处理链
func DefaultBuildHandlerChain(apiHandler http.Handler, c *Config) http.Handler {
   handler := genericapifilters.WithAuthorization(apiHandler, c.Authorization.Authorizer, c.Serializer)
   if c.FlowControl != nil {
      handler = genericfilters.WithPriorityAndFairness(handler, c.LongRunningFunc, c.FlowControl)
   } else {
      handler = genericfilters.WithMaxInFlightLimit(handler, c.MaxRequestsInFlight, c.MaxMutatingRequestsInFlight, c.LongRunningFunc)
   }
   handler = genericapifilters.WithImpersonation(handler, c.Authorization.Authorizer, c.Serializer)
   handler = genericapifilters.WithAudit(handler, c.AuditBackend, c.AuditPolicyChecker, c.LongRunningFunc)
   failedHandler := genericapifilters.Unauthorized(c.Serializer, c.Authentication.SupportsBasicAuth)
   failedHandler = genericapifilters.WithFailedAuthenticationAudit(failedHandler, c.AuditBackend, c.AuditPolicyChecker)
   handler = genericapifilters.WithAuthentication(handler, c.Authentication.Authenticator, failedHandler, c.Authentication.APIAudiences)
   handler = genericfilters.WithCORS(handler, c.CorsAllowedOriginList, nil, nil, nil, "true")
   handler = genericfilters.WithTimeoutForNonLongRunningRequests(handler, c.LongRunningFunc, c.RequestTimeout)
   handler = genericfilters.WithWaitGroup(handler, c.LongRunningFunc, c.HandlerChainWaitGroup)
   handler = genericapifilters.WithRequestInfo(handler, c.RequestInfoResolver)
   if c.SecureServing != nil && !c.SecureServing.DisableHTTP2 && c.GoawayChance > 0 {
      handler = genericfilters.WithProbabilisticGoaway(handler, c.GoawayChance)
   }
   handler = genericfilters.WithPanicRecovery(handler)
   return handler
}

这个请求的处理链是从后向前执行的。因此请求经过的 handler 为:

  • PanicRecovery
  • ProbabilisticGoaway
  • RequestInfo
  • WaitGroup
  • TimeoutForNonLongRunningRequests
  • CORS
  • Authentication
  • failedHandler: FailedAuthenticationAudit
  • failedHandler: Unauthorized
  • Audit
  • Impersonation
  • PriorityAndFairness / MaxInFlightLimit
  • Authorization

之后传递到 director,由 director 分到 gorestfulContainer 或 nonGoRestfulMux。gorestfulContainer 是 apiserver 主要部分。

director := director{
   name:               name,
   goRestfulContainer: gorestfulContainer,
   nonGoRestfulMux:    nonGoRestfulMux,
}

PanicRecovery

runtime.HandleCrash 防止 panic,并打了日志记录 panic 的请求详情

ProbabilisticGoaway

因为 client 和 apiserver 是使用 http2 长连接的。这样即使 apiserver 有负载均衡,部分 client 的请求也会一直命中到同一个 apiserver 上。goaway 会配置一个很小的几率,在 apiserver 收到请求后响应 GOWAY 给 client,这样 client 就会新建一个 tcp 连接负载均衡到不同的 apiserver 上。这个几率的取值范围是 0~0.02

相关的 PR:https://github.com/kubernetes/kubernetes/pull/88567

RequestInfo

RequestInfo 会根据 HTTP 请求进行解析处理。得到以下的信息:

// RequestInfo holds information parsed from the http.Request
type RequestInfo struct {
    // IsResourceRequest indicates whether or not the request is for an API resource or subresource
    IsResourceRequest bool
    // Path is the URL path of the request
    Path string
    // Verb is the kube verb associated with the request for API requests, not the http verb.  This includes things like list and watch.
    // for non-resource requests, this is the lowercase http verb
    Verb string

    APIPrefix  string
    APIGroup   string
    APIVersion string
    Namespace  string
    // Resource is the name of the resource being requested.  This is not the kind.  For example: pods
    Resource string
    // Subresource is the name of the subresource being requested.  This is a different resource, scoped to the parent resource, but it may have a different kind.
    // For instance, /pods has the resource "pods" and the kind "Pod", while /pods/foo/status has the resource "pods", the sub resource "status", and the kind "Pod"
    // (because status operates on pods). The binding resource for a pod though may be /pods/foo/binding, which has resource "pods", subresource "binding", and kind "Binding".
    Subresource string
    // Name is empty for some verbs, but if the request directly indicates a name (not in body content) then this field is filled in.
    Name string
    // Parts are the path parts for the request, always starting with /{resource}/{name}
    Parts []string
}

WaitGroup

waitgroup 用来处理短连接退出的。

如何判断是不是一个长连接呢?这里是通过请求的动作或者 subresource 来判断的。watch 和 proxy 这两个动作是在 requestinfo 上通过请求的 path 来判断的。

serverConfig.LongRunningFunc = filters.BasicLongRunningRequestCheck(
  sets.NewString("watch", "proxy"),
  sets.NewString("attach", "exec", "proxy", "log", "portforward"),
)

// BasicLongRunningRequestCheck returns true if the given request has one of the specified verbs or one of the specified subresources, or is a profiler request.
func BasicLongRunningRequestCheck(longRunningVerbs, longRunningSubresources sets.String) apirequest.LongRunningRequestCheck {
    return func(r *http.Request, requestInfo *apirequest.RequestInfo) bool {
        if longRunningVerbs.Has(requestInfo.Verb) {
            return true
        }
        if requestInfo.IsResourceRequest && longRunningSubresources.Has(requestInfo.Subresource) {
            return true
        }
        if !requestInfo.IsResourceRequest && strings.HasPrefix(requestInfo.Path, "/debug/pprof/") {
            return true
        }
        return false
    }
}

这样之后的 handler 全部退出后,这个 waitgroup 的 handler 才会 done。这样就能实现优雅退出了。

TimeoutForNonLongRunningRequests

对于非长连接的请求,使用 ctx 的 cancel 来在超时后取消请求。

CORS

设置一些跨域的响应头

Authentication

开始认证用户。认证成功会从请求中移除 Authorization。然后将请求交给下一个 handler,否则将请求交给下一个 failed handler。

处理的方式有很多中。包括:

  • Requestheader,负责从请求中取出 X-Remote-User,X-Remote-Group,X-Remote-Extra
  • X509 证书校验,
  • BearerToken
  • WebSocket
  • Anonymous: 在允许匿名的情况下

还有一部分是以插件的形式提供了认证:

  • bootstrap token

  • Basic auth

  • password
  • OIDC
  • Webhook

如果有一个认证成功的话,就认为认证成功。并且如果用户是 system:anonymous 或 用户组中包含 system:unauthenticatedsystem:authenticated。就直接返回,否则修改用户信息并返回:

r.User = &user.DefaultInfo{
        Name:   r.User.GetName(),
        UID:    r.User.GetUID(),
        Groups: append(r.User.GetGroups(), user.AllAuthenticated),
        Extra:  r.User.GetExtra(),
    }

注意到,user 现在已经属于 system:authenticated。也就是认证过了。

FailedAuthenticationAudit

这个只会在认证失败后才会执行。主要是提供了审计的功能。

Unauthorized

未授权的处理,在 FailedAuthenticationAudit 之后调用

Audit

提供请求的审计功能

Impersonation

impersonation 是一个将当前用户扮演为另外一个用户的特性,这个特性有助于管理员来测试不同用户的权限是否配置正确等等。取得 header 的 key 是:

  • Impersonate-User:用户
  • Impersonate-Group:组
  • Impersonate-Extra-:额外信息

用户分为 service account 和 user。根据格式区分,service account 的格式是 namespace/name,否则就是当作 user 对待。

Service account 最终的格式是: system:serviceaccount:namespace:name

PriorityAndFairness / MaxInFlightLimit

如果设置了流控,就使用 PriorityAndFairness,否则使用 MaxInFlightLimit。

PriorityAndFairness:会对请求做优先级的排序。同优先级的请求会有公平性相关的控制。

MaxInFlightLimit:在给定时间内进行中不可变请求的最大数量。当超过该值时,服务将拒绝所有请求。0 值表示没有限制。(默认值 400)

参考资料:https://kubernetes.io/zh/docs/concepts/cluster-administration/flow-control/

Authorization

// AttributesRecord implements Attributes interface.
type AttributesRecord struct {
   User            user.Info
   Verb            string
   Namespace       string
   APIGroup        string
   APIVersion      string
   Resource        string
   Subresource     string
   Name            string
   ResourceRequest bool
   Path            string
}

鉴权的时候会从 context 中取出上面这个结构体需要的信息,然后进行认证。支持的认证方式有:

  • Always allow
  • Always deny
  • Path: 允许部分路径总是可以被访问

其他的一些常用的认证方式主要是通过插件提供:

  • Webhook
  • RBAC
  • Node

其中 Node 专门为 kubelet 设计的,节点鉴权器允许 kubelet 执行 API 操作。包括:

读取操作:

  • services
  • endpoints
  • nodes
  • pods
  • secrets、configmaps、pvcs 以及绑定到 kubelet 节点的与 pod 相关的持久卷

写入操作:

  • 节点和节点状态(启用 NodeRestriction 准入插件以限制 kubelet 只能修改自己的节点)
  • Pod 和 Pod 状态 (启用 NodeRestriction 准入插件以限制 kubelet 只能修改绑定到自身的 Pod)
  • 事件

鉴权相关操作:

  • 对于基于 TLS 的启动引导过程时使用的 certificationsigningrequests API 的读/写权限
  • 为委派的身份验证/授权检查创建 tokenreviews 和 subjectaccessreviews 的能力

在将来的版本中,节点鉴权器可能会添加或删除权限,以确保 kubelet 具有正确操作所需的最小权限集。

为了获得节点鉴权器的授权,kubelet 必须使用一个凭证以表示它在 system:nodes 组中,用户名为 system:node:<nodeName>。 上述的组名和用户名格式要与 kubelet TLS 启动引导过程中为每个 kubelet 创建的标识相匹配。

director

director 的 ServeHTTP 方法定义如下,也就是会根据定义的 webservice 匹配规则进行转发。否则就调用 nonGoRestfulMux 进行处理。

func (d director) ServeHTTP(w http.ResponseWriter, req *http.Request) {
    path := req.URL.Path

    // check to see if our webservices want to claim this path
    for _, ws := range d.goRestfulContainer.RegisteredWebServices() { q 
        switch {
        case ws.RootPath() == "/apis":
            // if we are exactly /apis or /apis/, then we need special handling in loop.
            // normally these are passed to the nonGoRestfulMux, but if discovery is enabled, it will go directly.
            // We can't rely on a prefix match since /apis matches everything (see the big comment on Director above)
            if path == "/apis" || path == "/apis/" {
                klog.V(5).Infof("%v: %v %q satisfied by gorestful with webservice %v", d.name, req.Method, path, ws.RootPath())
                // don't use servemux here because gorestful servemuxes get messed up when removing webservices
                // TODO fix gorestful, remove TPRs, or stop using gorestful
                d.goRestfulContainer.Dispatch(w, req)
                return
            }

        case strings.HasPrefix(path, ws.RootPath()):
            // ensure an exact match or a path boundary match
            if len(path) == len(ws.RootPath()) || path[len(ws.RootPath())] == '/' {
                klog.V(5).Infof("%v: %v %q satisfied by gorestful with webservice %v", d.name, req.Method, path, ws.RootPath())
                // don't use servemux here because gorestful servemuxes get messed up when removing webservices
                // TODO fix gorestful, remove TPRs, or stop using gorestful
                d.goRestfulContainer.Dispatch(w, req)
                return
            }
        }
    }

    // if we didn't find a match, then we just skip gorestful altogether
    klog.V(5).Infof("%v: %v %q satisfied by nonGoRestful", d.name, req.Method, path)
    d.nonGoRestfulMux.ServeHTTP(w, req)
}

admission webhook

在请求真正被处理前,还差最后一步,就是我们的 admission webhook。admission 的调用是在具体的 REST 的处理代码中,在 create, update 和 delete 时,会先调用 mutate,然后再调用 validating。k8s 本身就内置了很多的 admission,以插件的形式提供,具体如下:

  • AlwaysAdmit
  • AlwaysPullImages
  • LimitPodHardAntiAffinityTopology
  • CertificateApproval/CertificateSigning/CertificateSubjectRestriction
  • DefaultIngressClass
  • DefaultTolerationSeconds
  • ExtendedResourceToleration
  • OwnerReferencesPermissionEnforcement
  • ImagePolicyWebhook
  • LimitRanger
  • NamespaceAutoProvision
  • NamespaceExists
  • NodeRestriction
  • TaintNodesByCondition
  • PodNodeSelector
  • PodPreset
  • PodTolerationRestriction
  • Priority
  • ResourceQuota
  • RuntimeClass
  • PodSecurityPolicy
  • SecurityContextDeny
  • ServiceAccount
  • PersistentVolumeLabel
  • PersistentVolumeClaimResize
  • DefaultStorageClass
  • StorageObjectInUseProtection

3. 如何阅读 apiserver 的相关代码

我看的是仓库是 https://github.com/kubernetes/kubernetes。apiserver 的代码主要分散在以下几个位置:

  • cmd/kube-apiserver: apiserver main 函数入口。主要封装了很多的启动参数。
  • pkg/kubeapiserver: 提供了 kube-apiserver 和 federation-apiserve 共用的代码,但是不属于 generic API server。
  • plugin/pkg: 这下面都是和认证,鉴权以及准入控制相关的插件代码
  • staging/src/apiserver: 这里面是 apiserver 的核心代码。其下面的 pkg/server 是服务的启动入口。

kubernetes 中的认证和授权

一、概述

kubernetes 中有两种用户类型:服务账户(service account)普通用户(user)。这两种用户类型对应了两种使用场景。

服务账户提供给在集群中运行的 pod,当这些 pod 要和 apiserver 通信时,就是使用 serviceaccount 来认证和授权。服务账户是存储在 k8s 集群中的,基于 RBAC,可以和角色进行绑定,从而拥有特定资源的特定权限。

普通用户是非 pod 的场景下用来做认证和授权。比如像 k8s 的一些关键组件: scheduler, kubelet 和 controller manager,包括使用 kubectl 和 k8s 集群做交互。

二、服务账户

2.1 自动化

即使我们不在 namespace 下创建服务账户,也不为 pod 绑定任何的服务账户,pod 的 serviceAccount 字段也会被设置为 default。任何 namespace 下都会有这样的服务账户。我们可以查看这个名为 default 的服务账户,它会对应一个 secret。secret 中记录了 ca.crt,namespace 和 token 这三个值。

这整个过程由三个组件完成:

  • 服务账户准入控制器(Service account admission controller)
  • Token 控制器(Token controller)
  • 服务账户控制器(Service account controller)

其中,服务账户控制器负责在每个 namespace 下维护默认的服务账户。这样当新的 namespace 被创建后,就会自动创建一个 default 服务账户。即使删除了该服务账户,也会立刻被重新自动创建出来。

token 控制器负责以下几项工作:

  • 检测服务账户的创建,并且创建相应的 Secret 以支持 API 访问。
  • 检测服务账户的删除,并且删除所有相应的服务账户 Token Secret。
  • 检测 Secret 的增加,保证相应的服务账户存在,如有需要,为 Secret 增加 token。
  • 检测 Secret 的删除,如有需要,从相应的服务账户中移除引用。

至于为什么需要为服务账户创建 token 并生成 secret,将在后面提到。

现在我们知道了服务账号和其 token 的自动化过程。那服务账户准入控制器又是什么作用呢?我们将目光投到 pod 创建的过程中,大多数时候我们都不会为 pod 指定服务账户。那么 pod 在创建成功后,关联的 default 服务账户是怎么回事呢?

这里就是服务账户准入控制器的作用了。它通过 admission controller 的机制来对 pod 进行修改。在 pod 被创建或更新时,会执行以下操作:

  • 如果该 pod 没有 ServiceAccount 设置,将其 ServiceAccount 设为 default

  • 保证 pod 所关联的 ServiceAccount 存在,否则拒绝该 pod。

  • 如果 pod 不包含 ImagePullSecrets 设置,那么 将 ServiceAccount 中的 ImagePullSecrets 信息添加到 pod 中。

  • 将一个包含用于 API 访问的 token 的 volume 添加到 pod 中。

  • 将挂载于 /var/run/secrets/kubernetes.io/serviceaccountvolumeSource 添加到 pod 下的每个容器中。

2.2 认证

假设我们的 pod 已经设置好了服务账户,现在要和 apiserver 通信,那么 apiserver 是怎么认证这个服务账户是有效的呢?

我们在上面提到,token 控制器会为服务账户创建 secret,secret 中的 token 就是服务账户的校验信息,具体来说是通过 JWT 来认证的。这个 token 中会存储服务账户所在的命名空间,名称,UID 和 secret 的名称等信息。如果你对 token 内容感兴趣的话,可以将 token 值用 base64 解码,粘贴到这里看看 token 中的内容。然后也可以将私钥和公钥粘贴上去验证签名是否正确。具体内容如下:

{
  "iss": "kubernetes/serviceaccount",
  "kubernetes.io/serviceaccount/namespace": "default",
  "kubernetes.io/serviceaccount/secret.name": "default-token-894m5",
  "kubernetes.io/serviceaccount/service-account.name": "default",
  "kubernetes.io/serviceaccount/service-account.uid": "df5a8a9c-14d4-44c7-a55f-0100f51fc848",
  "sub": "system:serviceaccount:default:default"
}

这个 token 在生成的过程中,使用了服务账户专属的私钥进行签名,这个私钥是在 contrller-manager 启动时,通过--service-account-private-key-file传进去的。同样的,为了在 apiserver 中对这个 token 进行校验,需要在 apiserver 启动时通过参数--service-account-key-file传入对应的公钥。

2.3 授权

认证的问题解决了,那么 apiserver 怎么知道该请求的服务账户是否有权限操作当前的资源呢?在 k8s 中,常用的授权策略就是 RBAC 了。我们通过将服务账户和角色关联,就可以让服务账户有指定资源的相关操作权限了。

三、普通用户

3.1 认证

不同于服务账户的是,k8s 本身并不存储普通用户的任何信息,那么 apiserver 是如何认证普通用户的呢?

在创建 k8s 集群时,一般都会有一个根证书负责签发集群中所需的其他证书。那么可以认为,如果一个普通用户可以提供由根证书签发的证书,他就是一个合法的用户。其中,证书的 common name 就是用户名,orgnization 是用户组。比如我们本地集群上的 controller-manager 的证书信息如下:

$ cfssl certinfo -cert controller-manager.pem
{
  "subject": {
    "common_name": "system:kube-controller-manager",
    "names": [
      "system:kube-controller-manager"
    ]
  },
  "issuer": {
    "common_name": "kubernetes",
    "names": [
      "kubernetes"
    ]
  },
  "serial_number": "7884702304157281003",
  "not_before": "2020-10-09T05:51:52Z",
  "not_after": "2021-10-09T05:51:54Z",
  "sigalg": "SHA256WithRSA",
  "authority_key_id": "11:F5:D7:48:AE:2E:7F:59:DD:4C:C4:A8:97:D2:C0:21:98:C6:3A:A7",
  "subject_key_id": "",
  "pem": "-----BEGIN CERTIFICATE-----\nMIIDCDCCAfCgAwIBAgIIbWwW+H7/quswDQYJKoZIhvcNAQELBQAwFTETMBEGA1UE\nAxMKa3ViZXJuZXRlczAeFw0yMDEwMDkwNTUxNTJaFw0yMTEwMDkwNTUxNTRaMCkx\nJzAlBgNVBAMTHnN5c3RlbTprdWJlLWNvbnRyb2xsZXItbWFuYWdlcjCCASIwDQYJ\nKoZIhvcNAQEBBQADggEPADCCAQoCggEBAMPCkXDAttbJHnoLuhGFPr/28ag8NoI5\nY0e00uv3ltyHlakfCeOV48eBgpMka3BdUxFOTHI5wtumlU3iymdDvTnKkLc75v6p\nQ0Hfx0DYz8ykDcHQ04hIsgyXecaHl+hfy90bYAbF8V43MjA0X2VmIyLxS6wXgeM6\n8d/jc1X8Ggpw53ow7L4XiCMlXDPwzLlVUThYHRN+PA5EdADZHAzgXjsyg379/ori\nbS/NZtmizzfHGWugrfwBGPL187mp1xN1tyjR+7obtsQYpgZ0Emz74fWNlike2I69\ntlBDWYC5ddsbHtDu4h/H5guwFtZ3+VVLogyw3CntPvoV840Ro5jxmtMCAwEAAaNI\nMEYwDgYDVR0PAQH/BAQDAgWgMBMGA1UdJQQMMAoGCCsGAQUFBwMCMB8GA1UdIwQY\nMBaAFBH110iuLn9Z3UzEqJfSwCGYxjqnMA0GCSqGSIb3DQEBCwUAA4IBAQBvUxh0\n+TDJn19qJPWXu5MGrRs1Efn+KCgSVMDcak9MfnG3kzCZ94SKw5PRYGQ6fzuUsgwT\nkbGJ3o4PR/BkZ9R2UUHa2prydQTHN+Qb/DuF3kVYTRbWxTN3br8Tp1uqiQVOLPe0\nrfRelwVR6y39O5Wc3VQCnQKM/ih4k2LKGwinq2sO7HN6pjwoKfapaOb050vrGOTu\n5RmX+SWs7CeWzITjC3sLfFyP/lh8zK7TINOKRx1/QBHlCnX4wnsXpOIe4Jf4ol1b\nKKGcicAcSrj252oOIxspAW8a7vX4DjVGRTSneQen5wbHeZbkeMyuvAVs2a73x94d\nfTH4K9+zxCLAVZFs\n-----END CERTIFICATE-----\n"
}

其中,subject 是证书申请人的信息,issuer 是签发人的信息。这里可以知道,controller-manager 使用的是 system:kube-controller-manager 这个用户。

3.2 授权

跟服务账户的授权一样,普通用户也可以通过 RBAC 的机制来绑定角色,然后拥有某些资源的某些权限。比如 controller-manager 的 ClusterRoleBinding 信息如下:

$ kubectl get clusterrolebinding  system:kube-controller-manager -o yaml
apiVersion: rbac.authorization.k8s.io/v1
kind: ClusterRoleBinding
metadata:
  annotations:
    rbac.authorization.kubernetes.io/autoupdate: "true"
  creationTimestamp: "2020-09-22T12:33:24Z"
  labels:
    kubernetes.io/bootstrapping: rbac-defaults
  name: system:kube-controller-manager
roleRef:
  apiGroup: rbac.authorization.k8s.io
  kind: ClusterRole
  name: system:kube-controller-manager
subjects:
- apiGroup: rbac.authorization.k8s.io
  kind: User
  name: system:kube-controller-manager

也就是绑定到了 system:kube-controller-manager 这个集群角色,如果你感兴趣的话,还可以继续看这个角色绑定了哪些资源极其操作权限。

3.3 实践

因为普通用户需要我们自己为其签发证书,然后授权。下面用一个简单的例子来走一遍。

首先创建一个证书签发请求的 json 文件:

{
    "CN": "jiang",
    "key": {
        "algo": "ecdsa",
        "size": 256
    },
    "names": [
        {
            "O": "dev"
        }
    ]
}

CN 是 common name 的简写。也就是我们要设置的用户名。O 是 orgnization 的简写,可以理解为用户组。接下来用 k8s 的根证书签发,需要 ca.crt 和 ca.key。这两个文件可以在 master 节点上的 /etc/kubernetes/certs或其他地方找到。

cfssl gencert -ca ca.crt -ca-key=ca.key jiang.json | cfssljson -bare jiang

这条命令会生成三个新的文件:

  • jiang-key.pem:私钥
  • jiang.pem:证书
  • jiang.csr: 证书签发请求文件

下面我们用 jiang 的私钥和证书生成 kubeconfig 中的用户:

kubectl config set-credentials jiang --client-key=./jiang-key.pem --client-certificate=./jiang.pem --embed-certs

接下来生成新的 context,指定 k8s 集群要使用的用户:

kubectl config set-context k8s-jiang --user=jiang --cluster=k8s

为 jiang 这个用户创建角色和绑定。这里只允许 jiang 这个用户读取 default namespace 下的 pod。

apiVersion: rbac.authorization.k8s.io/v1
kind: Role
metadata:
    name: pod-reader
    namespace: default
rules:
- apiGroups: [""]
  resources: ["pods"]
  verbs: ["get", "watch", "list"]

---

apiVersion: rbac.authorization.k8s.io/v1
kind: RoleBinding
metadata:
    name: read-pods
    namespace: default
subjects:
- kind: User
  name: jiang
  apiGroup: rbac.authorization.k8s.io
roleRef:
  kind: Role
  name: pod-reader
  apiGroup: rbac.authorization.k8s.io

这样就完成了对 jiang 这个用户的认证和授权了。使用下面命令切换到这个用户:

kubectl config use-context k8s-jiang

kubernetes 中的垃圾回收机制

一、概述

一个运行中的 kubernetes 集群,存储了非常多的相互关联的资源,比如我们常用的 deployment,replicaset 和 pod,就是一组有关联的资源。我们在创建 deployment 时,相关的控制器就会自动创建出 replicaset,之后 replicaset 的控制器又会创建出 pod 来运行我们部署的服务。那么同样的,我们肯定也希望在删除 deployment 之后,会自动删除 replicaset 和 pod。这个机制就叫做垃圾回收(下面简称 GC)。

在早期的版本中,GC 是由客户端实现的,比如使用 kubectl delete deployment nginx 这样的命令,kubectl 会删除 pod 和 replicaset。但是这种方式增加了客户端的实现复杂度,不利于统一管理。因此提出了在服务端实现 GC 的需求。实现 GC 有三个主要目标,我们在之后分析的时候,也主要是围绕这三个主要目标进行。

  • 在服务端支持级联删除
  • 中心化级联删除的逻辑,而不是分布在各个组件内
  • 可以选择不删除被依赖的资源。如只删除 deployment,但是保留 replicaset 和 pod

kubernetes 的 GC 是在 controller manager 中,作为一个单独的 controller 来实现的。它通过 discovery client 来动态发现并监听集群中所有支持 delete,listwatch的资源。然后构造资源之间的关系图来记录资源之间的依赖关系。

二、预备知识

为了更好的阐述 kubernetes 的 GC 机制,这里先将一些 k8s 基本知识做一些阐述。

  • finalizer: finalizer 可以翻译为终结期。是一种用来保证资源在被删除之前,能够有机会做一些清理工作的机制。
  • kubernetes 的删除传播策略有三种:
    1. Orphan. 这种策略下,会保留被依赖的资源。如只删除 deployment,但是保留 replicaset 和 pod。
    2. Background. 从 etcd 中删除资源,被依赖的资源由 GC 机制来删除。
    3. Foreground. apiserver 不会删除该资源。而是在它的 finalizer 中添加 foregroundDeletion,并且设置当前的删除时间戳。然后 GC 会先从 etcd 中删除有 ownerReference.blockOwnerDeletion=true 的被依赖资源。最后再删除当前资源。
  • UID。k8s 中的每个资源都有一个唯一的 UID。这个 UID 在整个集群的生命周期中,对于每一个资源来说都是唯一的。所有在标记资源的依赖关系时,需要使用 UID。
  • ownerReferences。每个资源的 metadata 中都会有这个字段,它是一个数组,用来表示该资源的 owner 有哪些。每当 owner 资源被删除,就会从这个数组中移除。当所有的 owner 都被删除后,GC 就会回收该资源。
  • Dependents。如果一组资源 G 的 ownerReference 指向某个具体的资源 A。那个 A 的 dependents 就是 G

三、垃圾回收的实现机制

kubernetes 的 GC 主要由两部分组成:

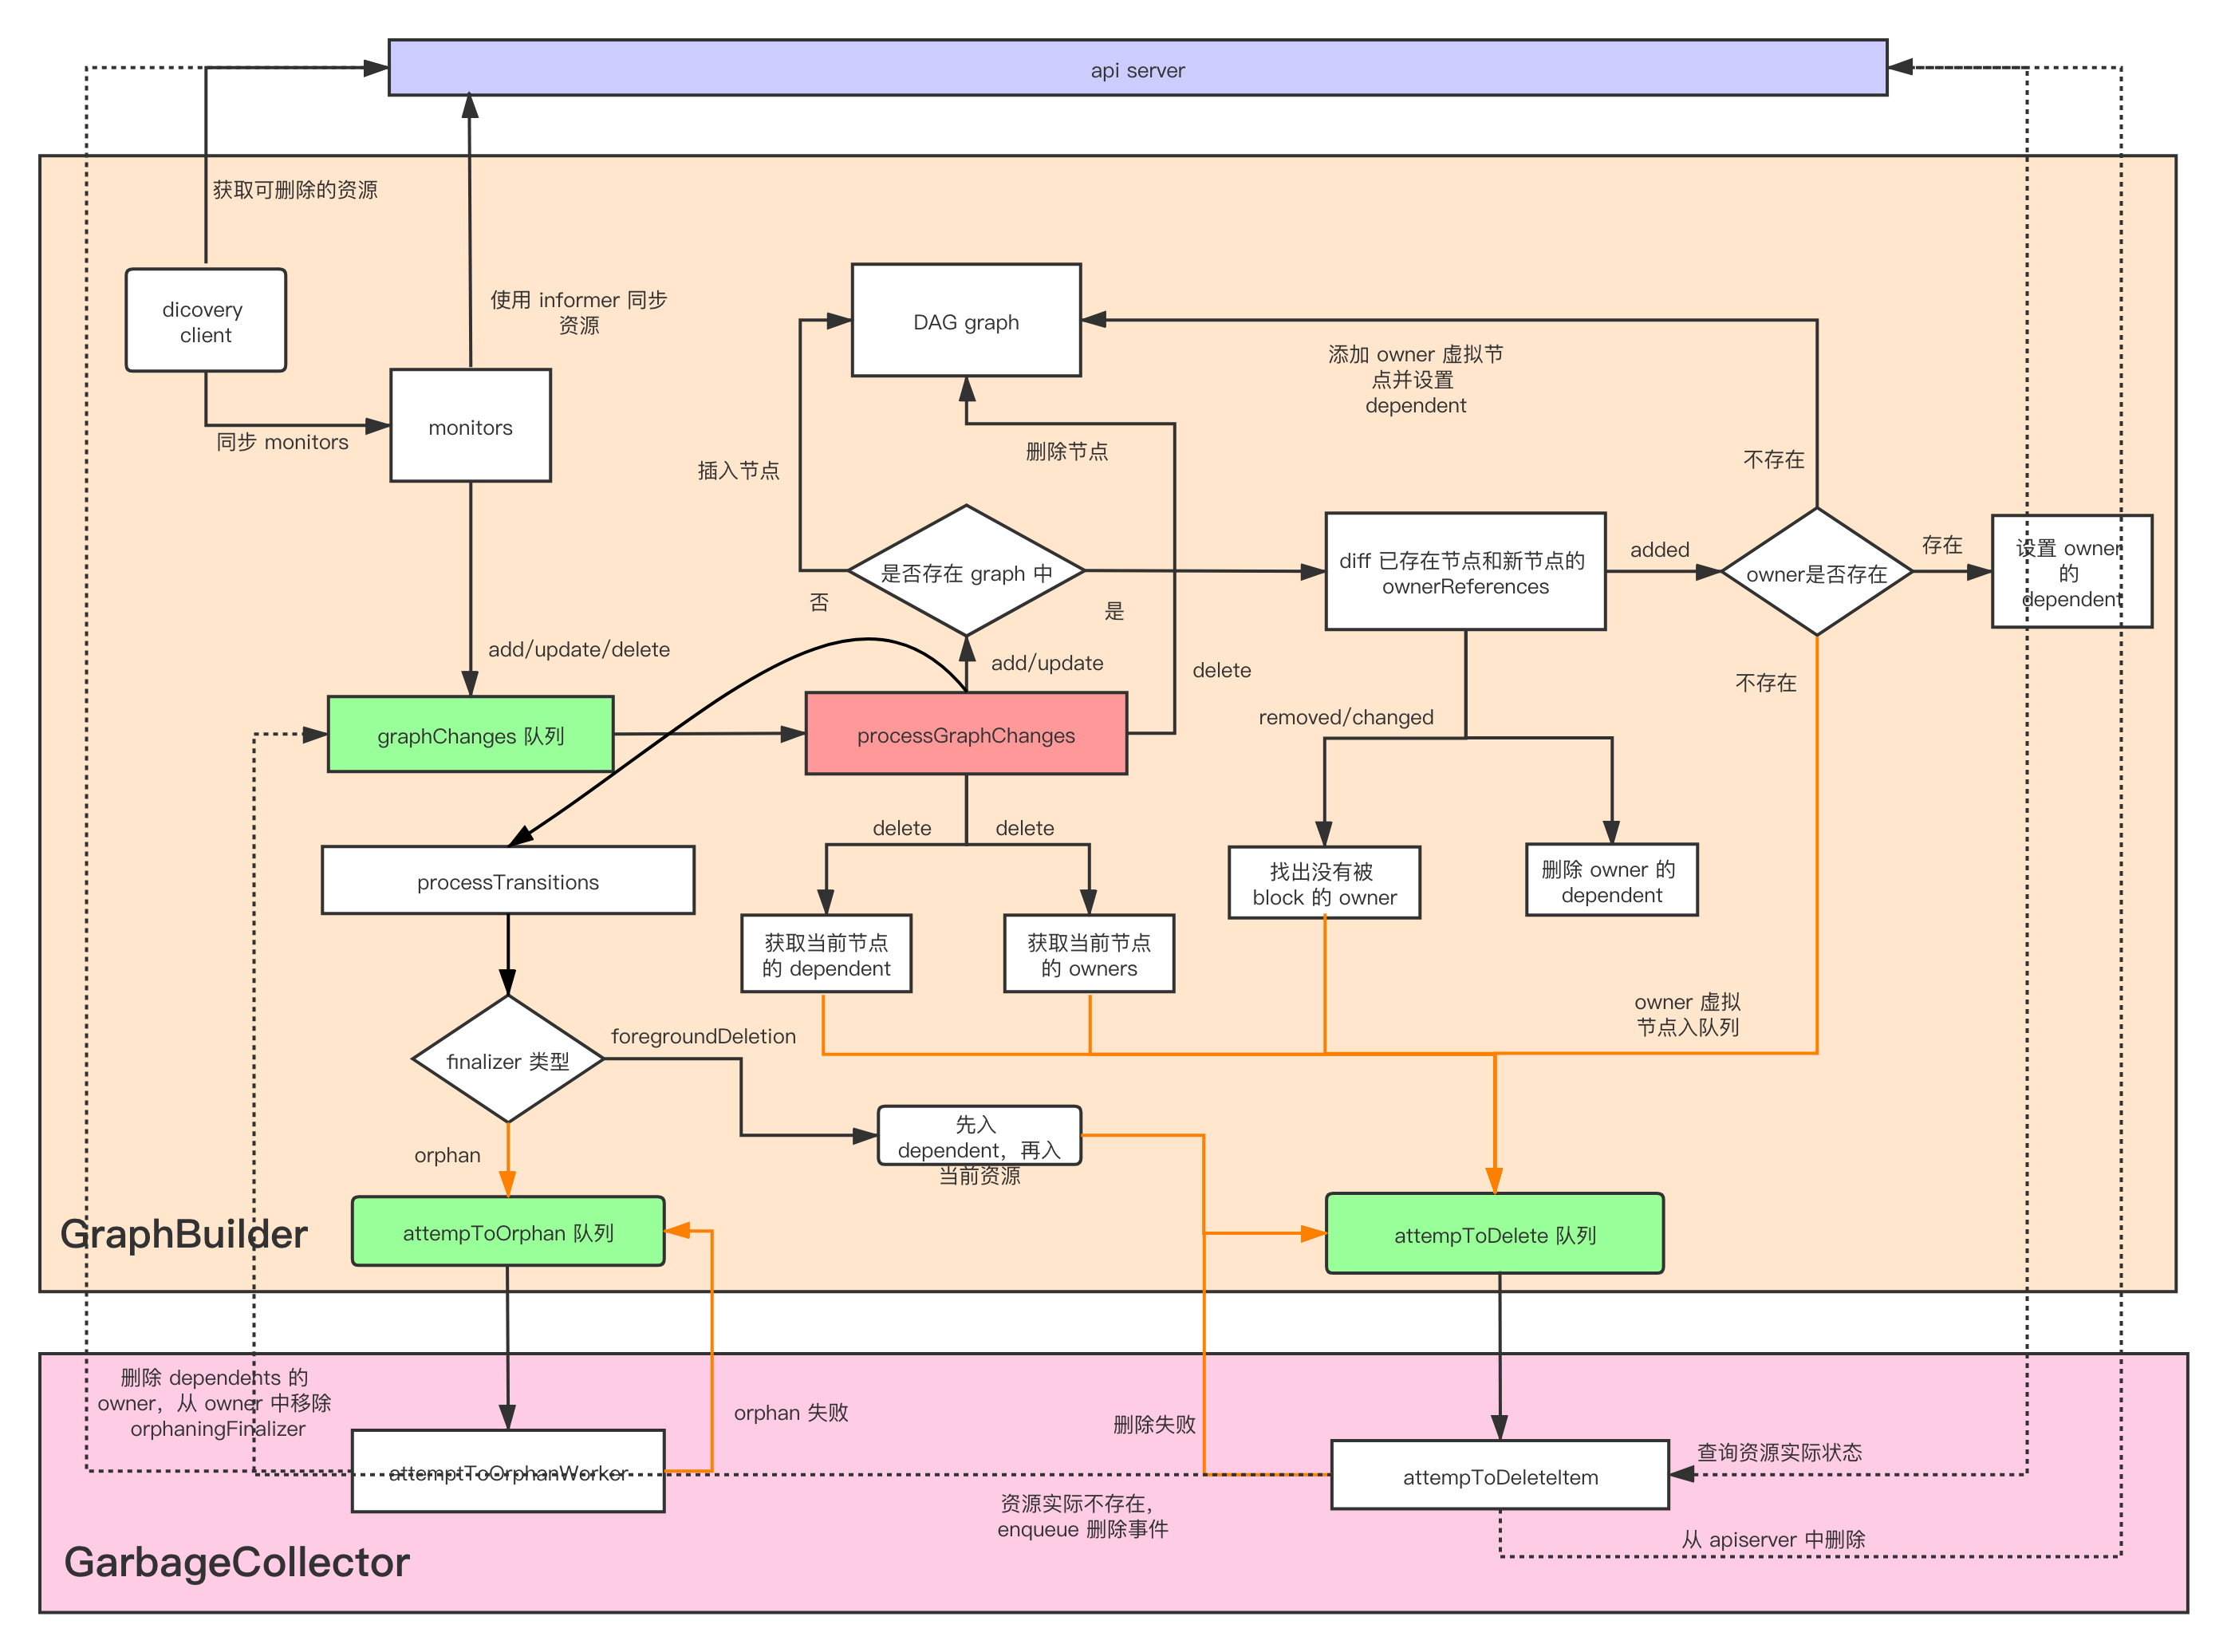
  • GraphBuilder 主要用来使用 monitors 监听 apiserver 上的所有资源,通过将所有资源的事件插入到 graphChanges 队列中,然后调用 processGraphChanges 方法,从队列中依次取出元素,构建资源之间的依赖关系。并根据情况插入到 attemptToDelete 或 attemptToOrphan 队列中。
  • GarbageCollector 负责从 attemptToDelete 和 attemptToOrphan 队列中取出资源,然后通过一系列负责的过程,判断是否能删除,并进行相关的处理。

因此,对于垃圾回收实现机制的分析,主要从这两部分进行。

3.1 graph builder 的实现

graph builder 可以看做是集群资源状态的维护者。其本身并不会通过 apiserver 修改任何的资源。其定义如下:

// GraphBuilder 处理 informers 提供的事件,更新 uidToNode,使用 LRU 缓存依赖资源,并将
// 资源送入到 attemptToDelete 和 attemptToOrphan 队列
type GraphBuilder struct {
    restMapper meta.RESTMapper

  // 每个 monitor 都会 list/watches 一个资源,结果会被导入到 dependencyGraphBuilder 中·
    monitors    monitors
    monitorLock sync.RWMutex

    informersStarted <-chan struct{}
    stopCh <-chan struct{}
    running bool

    metadataClient metadata.Interface
  // monitors 是该队列的生产者,graphBuilder 根据这些改变来修改内存中的 graph
    graphChanges workqueue.RateLimitingInterface
  // 资源 uid 对应到 graph 中的 node
    uidToNode *concurrentUIDToNode
  // GraphBuilder 是 attemptToDelete 和 attemptToOrphan 的生产者,GC 是消费者。
    attemptToDelete workqueue.RateLimitingInterface
    attemptToOrphan workqueue.RateLimitingInterface
  // GraphBuilder 和 GC 共享 absentOwnerCache. 目前已知的不存在的对象会被添加到缓存中
    absentOwnerCache *UIDCache
    sharedInformers  controller.InformerFactory
    ignoredResources map[schema.GroupResource]struct{}
}

组成 graph 的 node 定义如下:

// 单线程的 GraphBuilder.processGraphChanges() 是 nodes 的唯一 writer。多线程的 GarbageCollector.attemptToDeleteItem() 读取 nodes。
type node struct {
    identity objectReference
    dependentsLock sync.RWMutex
    // dependents 是当前 node 的依赖资源。比如当前 node 是 replicaset,那么这里面保存的应该就是多个 pod
    dependents map[*node]struct{}
    // this is set by processGraphChanges() if the object has non-nil DeletionTimestamp
    // and has the FinalizerDeleteDependents.
    deletingDependents     bool
    deletingDependentsLock sync.RWMutex
    // this records if the object's deletionTimestamp is non-nil.
    beingDeleted     bool
    beingDeletedLock sync.RWMutex
    // this records if the object was constructed virtually and never observed via informer event
    virtual     bool
    virtualLock sync.RWMutex
    // when processing an Update event, we need to compare the updated
    // ownerReferences with the owners recorded in the graph.
    owners []metav1.OwnerReference
}

GraphBuilder 会和 apiserver 同步 monitors,然后为每种资源创建一个 monitor,通过 informer 同步资源的状态。所有的资源都会直接进入 graphChanges 队列。然后在 processGraphChanges 方法中统一处理。

对于 Add 和 Update 事件:

  • 如果当前资源不存在 graph 中,就会实例化出一个 Node 对象,加入到 graph 中。然后将该 node 加入到其 owners 的 dependents 数组中。 这里有一个细节,就是有可能出现一种情况,当前 node 所代表的资源通过 informer 被同步到本地缓存中,但是其 owner 还没有被同步过来。这样更新 owners 的 dependents 就会有遗漏。因此每个 node 都有一个 virtual 字段,在 owner 还没有被同步时,实例化一个虚拟的 owner node 加入到 graph 中。并且将这个虚拟 node 添加到 attemptToDelete 队列中,由之后的 GC 处理。如果这个虚拟 node 在之后被 processGraphChanges 发现了,就会调用 markObserved() 将 virtual 置为 false。
  • 如果已经存在了,那么就要比对新旧资源的 ownerReferences 的变化情况。这里会计算出 added, removed 和 changed。ownerReferences 的变化可能会带来以下要处理的情况。
    • 之前提到 Foreground 的删除,ownerReference 带有 blockOwnerDeletion=true 的资源会 block 的 owner 的删除。那么这里因为 ownerReferences 的变化,需要做以下两点:
    • 对于 removed 的 ownerReference,如果 blockOwnerDeletion 为 true。就说明当前不允许再 block 该 node owner 的删除。因此将 owner 放到 attemptToDelete 队列中,等待 GC 的处理。
    • 对于更新的 ownerReference,如果之前 blockOwnerDeletion 为 true,现在为 false,那么也要加入到 attemptToDelete 队列。
    • 对于 added 和 removed,都需要更新对应的 owner node 的 dependents。
  • 无论是 Add 还是 Update 事件,都会调用 processTransitions 方法,
    • 如果 old object 没有被删除或者没有 orphan finalizer,但是 new object 被删除了或者有 orphan finalizer,就会将该节点插入到 attemptToOrphan 队列。
    • 如果 old object 没有被删除或者没有 foregroundDeletion finalizer,但是 new object 被删除了或者有 foregroundDeletion finalizer,就会将该节点的 dependents 都插入到 attemptToDelete 队列,再将节点插入到 attemptToDelete 队列。

对于删除事件

  • 会从当前的 graph 中移除该 node。起始就是从 uidToNode 中删除该 node,然后更新所有的 owner 的 dependents。
  • 如果当前 node 的 dependents 大于 0,就将当前 node 添加到 absentOwnerCache 中。
  • 将该 node 的 dependents 将入到 attemptToDelete 队列中(垃圾回收)。
  • 最后,从该 node 中找到处于 deletingDependents=true 状态的 owner,也插入到 attemptToDelete 队列中。这里是为了让 GC 检查该 owner 是不是所有的 dependents 都被删除了,如果是,就将该 owner 也删除(这里 owner 处于 deletingDependents,说明使用了 foregroundDeletion,因此需要先删除 dependents,再删除 owner)。

因此可以知道,以下状态的资源会被插入到 attemptToDelete 队列中:

  • finalizers 中有 foregroundDelete
  • owner 的 finalizers 中有 foregroundDelete
  • owner 资源被删除
  • Dependents 中有资源被删除,并且当前状态还不是正在删除 deletingDependents
  • owner 处于 deletingDependents

以下状态的资源会被插入到 attemptToOrphan 队列中:

  • finalizers 中有 orphan

3.2 GarbageCollector 的实现

在 3.1 中提到,GC 会消费 GraphBuilder 的 attemptToDelete 和 attemptToOrphan 队列,来执行 delete 或 orphan 操作。因此我们这里主要关心,什么样的资源可以被 GC delete 或者 orphan。

3.2.1 attemptToDeleteItem

  • 对于 DeletionTimestamp 不为空,并且不处于删除 dependents 的资源。直接跳过处理流程。
  • 如果资源处于 deletingDependents 状态,则统计 blockOwnerDeletion=true的 dependents 个数。
    • 如果为 0,说明当前资源可以删除了,则移除 foregroundDeletion 这个 finalizer 即可。
    • 否则将 dependents 插入到 attemptToDelete 队列中
    • 之后会退出这个循环
  • 对资源的 ownerReferences 进行分类
    • Dangling: owner 对应的资源实际已经不存在了。
    • waitingForDependentsDeletion: owner 的 DeletionTimeStamp 不为空,但是有 foregroundDeletion,所以正在等待 dependents 删除
    • solid: owner 存在,并且不是 waitingForDependentsDeletion
  • 如果 solid 不为空,那么当前资源就不能被 GC,因此只需要通过 patch 来移除 dangling 和 waitingForDependentsDeletion 的 ownerReferences
  • 如果 waitingForDependentsDeletion 不为空并且当前资源的 dependents 不为空。这个判断用来处理循环依赖的异常情况,因为当前资源并不处于删除状态且有 dependents,其 owner 又在等待该 item 的删除,说明这里有一个循环依赖。解决办法就是通过 patch 去更改该资源的 blockOwnerDeletion 为 false。
  • 如果上面两种情况都不是。就会根据当前资源的 finalizer 来删除资源
    • orphan
    • foreground
    • Background

因此可以得出,以下状态的资源会被 GC 调用删除请求:

  • 资源处于 deletingDependents 状态,且其没有 dependents 的 blockOwnerDeletion 为 true。先移除 foregroundDeletion finalizer,然后删除
  • 资源的 owner 和 dependents 都有 blockOwnerDeletion。如果 dependents 处于 deletingDependents 状态。为了防止存在循环依赖,会先把 owner 的 unblock。然后使用 foreground 来删除当前资源。
  • 资源没有 solid 的 owner,那么这个资源就是应该被级联删除的资源。所以根据该资源的 finalizer 来删除。默认使用 background 的方式删除。

3.2.2 attemptToOrphan

orphan 是防止某些情况下资源被 GC 回收的方式。attemptToOrphan 的逻辑要简短一些,如下:

  • 移除 dependents 对当前资源 ownerReferences
  • 移除该资源的 orphan finalizer (这个更新事件会被 GraphBuilder 获取到,然后该资源符合进入 attemptToDelete 队列的条件。之后再由 GC 的处理,最终会被删除。)

总结

根据以上流程,附上自己整理的一个整体的 GC 流程图

k8s-gc

参考

garbage collection

k8s 中删除 namespace 时发生了什么

一、概述

namespace 是 kubernetes 中一个比较重要的概念,是对一组资源和对象的抽象,也常用来作不同用户的隔离。namespace 下有很多资源,比如我们常用的 deployment, pods, service, ingress, configmap 等等。

当然本篇文章的重点在于删除 namespace 时发生了什么?一个很典型的场景是在终端中执行 kubectl delete ns test 时,我们会观察到,在执行命令后,test 命名空间会立刻进入 terminating 状态,在几秒钟之后,才会被真正删除。即使 test 命名空间中没有任何资源。

NAME              STATUS   AGE
default           Active   2d2h
docker            Active   2d2h
kube-node-lease   Active   2d2h
kube-public       Active   2d2h
kube-system       Active   2d2h
test              Active   4s
test              Terminating   18s
test              Terminating   23s

因此,我们在下面会探究以下几点:

  • api-server 如何处理 namespace 的删除请求
  • 删除 namespace 时如何处理其中的资源

二、api server 如何处理 namespace 删除请求

和其他资源不同,namespace 在删除时,需要先清空 namespace 下资源。因此 namespace 有两种状态,即 active 和 terminating。当 namespace 处于 terminating 时,说明其下的资源还没有被确认删除干净。因此,api-server 在收到 namespace 的删除请求时,并不会立刻将其从 etcd 中删除,而是先检查 metadata.DeletionTimestamp 是否为空,如果为空,则是先将 metadata.DeletionTimestamp 置为当前时间,然后将 status.Phase 置为 terminating。如果 metadata.DeletionTimestamp 不为空,还要再判断 spec.Finalizers 是否为空。如果为空,才会真正的删除该 namespace。

这样的处理方式,就保证了在 spec.Finalizers 不为空时,namespace 不会被删除。那么 finalizer 是在什么时候添加的呢?具体的作用是怎么体现的?

三、finalizer 机制

namespace 的 finalizer 其实在创建的时候就已经添加上去了。处理逻辑可见以下代码:

// PrepareForCreate clears fields that are not allowed to be set by end users on creation.
func (namespaceStrategy) PrepareForCreate(ctx context.Context, obj runtime.Object) {
    // on create, status is active
    namespace := obj.(*api.Namespace)
    namespace.Status = api.NamespaceStatus{
        Phase: api.NamespaceActive,
    }
    // on create, we require the kubernetes value
    // we cannot use this in defaults conversion because we let it get removed over life of object
    hasKubeFinalizer := false
    for i := range namespace.Spec.Finalizers {
        if namespace.Spec.Finalizers[i] == api.FinalizerKubernetes {
            hasKubeFinalizer = true
            break
        }
    }
    if !hasKubeFinalizer {
        if len(namespace.Spec.Finalizers) == 0 {
            namespace.Spec.Finalizers = []api.FinalizerName{api.FinalizerKubernetes}
        } else {
            namespace.Spec.Finalizers = append(namespace.Spec.Finalizers, api.FinalizerKubernetes)
        }
    }
}

然后在删除时 namespace 变更到 terminating 状态,namespace controller 就开始发挥作用了。namespace controller 属于 controller manager,其会监听 namespace 的 add 和 update 事件

    // configure the namespace informer event handlers
    namespaceInformer.Informer().AddEventHandlerWithResyncPeriod(
        cache.ResourceEventHandlerFuncs{
            AddFunc: func(obj interface{}) {
                namespace := obj.(*v1.Namespace)
                namespaceController.enqueueNamespace(namespace)
            },
            UpdateFunc: func(oldObj, newObj interface{}) {
                namespace := newObj.(*v1.Namespace)
                namespaceController.enqueueNamespace(namespace)
            },
        },
        resyncPeriod,
    )

并且会使用 workqueue 来保存每一个 namespace 的变化事件。然后统统触发 nm.namespacedResourcesDeleter.Delete(namespace.Name)。当然,如果 namespace 不存在或者 namespace.DeletionTimestamp 为空,则会退出:

    namespace, err := d.nsClient.Get(context.TODO(), nsName, metav1.GetOptions{})
    if err != nil {
        if errors.IsNotFound(err) {
            return nil
        }
        return err
    }
    if namespace.DeletionTimestamp == nil {
        return nil
    }

否则无论如何都会先将 namespace 的 phase 先置为 terminating。这也就是说,如果一个 namespace 已经处于 terminating 了,你就无法通过仅仅修改该 phase 来改变该 namespace 的状态。我之前在遇到过 namespace 一直处于 terminating 时,手动修改了 phase 为 active,但是 namespace 会立刻变为 terminating,原因大概就是如此了。

// updateNamespaceStatusFunc will verify that the status of the namespace is correct
func (d *namespacedResourcesDeleter) updateNamespaceStatusFunc(namespace *v1.Namespace) (*v1.Namespace, error) {
    if namespace.DeletionTimestamp.IsZero() || namespace.Status.Phase == v1.NamespaceTerminating {
        return namespace, nil
    }
    newNamespace := v1.Namespace{}
    newNamespace.ObjectMeta = namespace.ObjectMeta
    newNamespace.Status = *namespace.Status.DeepCopy()
    newNamespace.Status.Phase = v1.NamespaceTerminating
    return d.nsClient.UpdateStatus(context.TODO(), &newNamespace, metav1.UpdateOptions{})
}

之后就开始尝试清空该 namespace 下的所有内容:

    // there may still be content for us to remove
    estimate, err := d.deleteAllContent(namespace)
    if err != nil {
        return err
    }
    if estimate > 0 {
        return &ResourcesRemainingError{estimate}
    }

四、DiscoveryInterface 的工作机制

现在我们面临的一个问题就是如何清理该 namespace 下的所有资源呢?平时如果我们要删除一个 pod,我们可以调用 client-go 提供的 PodInterface 接口来删除,其实就是 RESTful 的 HTTP DELETE 动作的封装。但是现在因为我们不知道 namespace 下有哪些资源,所以就没有办法直接调用删除的接口。

所以 client-go 还提供了一个 DiscoveryInterface,顾名思义,DicoveryInterface 可以用来发现集群中的 API groups,versions, resources。在取得集群中所有的接口资源列表口,我们就可以对这些资源进行查询和删除了。DicoveryInterface 接口如下:

// DiscoveryInterface holds the methods that discover server-supported API groups,
// versions and resources.
type DiscoveryInterface interface {
    RESTClient() restclient.Interface
    ServerGroupsInterface
    ServerResourcesInterface
    ServerVersionInterface
    OpenAPISchemaInterface
}

其中 ServerGroupInterface 提供了获取集群中所有接口组的能力,具体的函数签名如下:

    // ServerGroups returns the supported groups, with information like supported versions and the
    // preferred version.
    ServerGroups() (*metav1.APIGroupList, error)

ServerVersionInterface 可以用来获取服务的版本信息,具体的函数签名如下:

    // ServerVersion retrieves and parses the server's version (git version).
    ServerVersion() (*version.Info, error)

然后我们需要关注的是 ServerResourcesInterface 这个接口

// ServerResourcesInterface has methods for obtaining supported resources on the API server
type ServerResourcesInterface interface {
    // ServerResourcesForGroupVersion returns the supported resources for a group and version.
    ServerResourcesForGroupVersion(groupVersion string) (*metav1.APIResourceList, error)
    // ServerResources returns the supported resources for all groups and versions.
    //
    // The returned resource list might be non-nil with partial results even in the case of
    // non-nil error.
    //
    // Deprecated: use ServerGroupsAndResources instead.
    ServerResources() ([]*metav1.APIResourceList, error)
    // ServerResources returns the supported groups and resources for all groups and versions.
    //
    // The returned group and resource lists might be non-nil with partial results even in the
    // case of non-nil error.
    ServerGroupsAndResources() ([]*metav1.APIGroup, []*metav1.APIResourceList, error)
    // ServerPreferredResources returns the supported resources with the version preferred by the
    // server.
    //
    // The returned group and resource lists might be non-nil with partial results even in the
    // case of non-nil error.
    ServerPreferredResources() ([]*metav1.APIResourceList, error)
    // ServerPreferredNamespacedResources returns the supported namespaced resources with the
    // version preferred by the server.
    //
    // The returned resource list might be non-nil with partial results even in the case of
    // non-nil error.
    ServerPreferredNamespacedResources() ([]*metav1.APIResourceList, error)
}

这里我们可以用 ServerPreferredNamespacedResources 来获取所有属于 namespace 的资源列表。然后过滤出支持 DELETE 的资源。最后获取这些资源的 GroupVersionResources(简称 GVR )。

    resources, err := d.discoverResourcesFn()
    if err != nil {
        // discovery errors are not fatal.  We often have some set of resources we can operate against even if we don't have a complete list
        errs = append(errs, err)
        conditionUpdater.ProcessDiscoverResourcesErr(err)
    }
    // TODO(sttts): get rid of opCache and pass the verbs (especially "deletecollection") down into the deleter
    deletableResources := discovery.FilteredBy(discovery.SupportsAllVerbs{Verbs: []string{"delete"}}, resources)
    groupVersionResources, err := discovery.GroupVersionResources(deletableResources)
    if err != nil {
        // discovery errors are not fatal.  We often have some set of resources we can operate against even if we don't have a complete list
        errs = append(errs, err)
        conditionUpdater.ProcessGroupVersionErr(err)
    }

最后遍历这些 GVR 进行删除:

    for gvr := range groupVersionResources {
        gvrDeletionMetadata, err := d.deleteAllContentForGroupVersionResource(gvr, namespace, namespaceDeletedAt)
    }

五、为什么 namespace 会长时间处于 terminating 状态

要探究 namespace 长时间处于 terminating 状态的原因,我们先看下面一段很短的代码:

    // there may still be content for us to remove
    estimate, err := d.deleteAllContent(namespace)
    if err != nil {
        return err
    }
    if estimate > 0 {
        return &ResourcesRemainingError{estimate}
    }

在删除命名空间下所有资源的时候,如果返回了错误,或者预估删除完所有资源的时间大于 0 的话,就会继续处于 terminating 状态。比如说 pod 会有一个 terminationGracePeriodSeconds,那么在删除 pod 的时候就可能要等待这个周期过去。但是这也造成不了什么问题,我们常常遇到的头疼问题是,namespace 一直无法删除。简单来说,就是 namespace 下肯定还有资源没法删除,可能性有以下几种。

部分资源有 admission 阻止了删除,因为所有的删除请求都要先进过 admission webhook,那么可能因为 admission 的原因导致部分资源无法直接删除。

apiservice 出问题了。这个问题我们可以通过 kubectl get apiservice 来确认,在 AVAILABLE 一列中,如果有 false 的话,我们就要去检查这个 apiservice 无法使用的原因了。因为 apiservice 出了问题,就会导致这个 apiservice 下的资源无法通过 HTTP 请求去查询或操作,那么自然无法确认是否还有这部分资源遗留,也就无法彻底删除了。

最后,关于 namespace 无法删除的解决方案,网上给出的方案往往是通过置空 namespace 的 spec.finalizers 来做,但是这是治标不治本的方法。因为如果 namespace 无法删除,就一定说明你的集群中存在缺陷或问题,还是要找出真正的原因才是解决之道。你也可以尝试这个工具找出问题所在:https://github.com/thyarles/knsk

informer 的基础知识

简介

informer 是 client-go 提供的一个工具,主要是用来在 api-server 和程序之间同步指定的资源,并作为本地缓存,比如 Pod, Deployment 等等。

我们都知道,kubernetes 中有很多个 controller 在运行,来保证它们关注的资源处于符合期望的状态。比如 ReplicasSet,会保证该 ReplicaSet 有期望的副本数一直运行。这是通过一个不会终止的循环,不断监控当前集群的状态,然后调整的期望的状态。如下代码所示:

for {
    current := getCurrentState()
    desired := getDesiredState()
    reconcile(current, desired)
}

因为这样的需求,所以 controller 需要不停的获取集群中一些资源的状态,然后调整到期望的状态。如果我们是通过网络不停的查询集群状态,将是一个性能很差的方案。为了性能,可以使用缓存,来将指定的资源保存在本地,只要我们及时的更新缓存,就不需要通过网络向集群查询了。

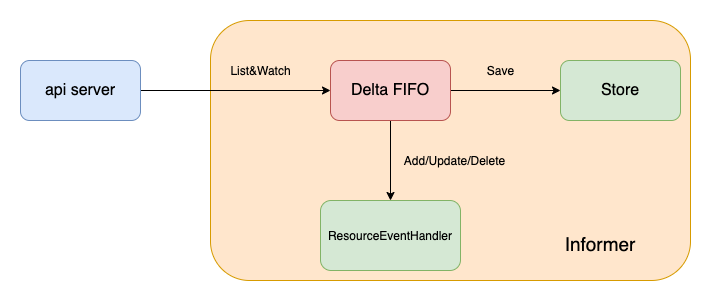
这就是 informer 出现的原因。它通过 List&Watch 来实时同步 api-server 中的资源,然后将资源分成三种事件来触发不同的处理。这三种事件是: Add, UpdateDelete。同时它还提供了一个抽象的 Store 来提供本地缓存的查询。

最后,它还可以配合 workqueue 来实现本地的重试等等。informer 是一个非常强大的工具,在我们做 kubernetes 上 controller 的开发时必不可少,但是因为 controller 的编写本身就是一件比较复杂的工作,我们必须要对 informer 本身,以及其周边的工具有清晰的理解,才能写出质量更好的代码。

工作流程

informer

这里先放上一张图来做参考。一般我们在使用 informer 时,会使用如下的代码:

// filterd
lw := cache.ListWatch{
    ListFunc: func(options metav1.ListOptions) (object runtime.Object, err error) {
        return k8sCli.CoreV1().Pods(metav1.NamespaceAll).List(context.TODO(), options)
    },
    WatchFunc: func(options metav1.ListOptions) (w watch.Interface, err error) {
        return k8sCli.CoreV1().Pods(metav1.NamespaceAll).Watch(context.TODO(), options)
    },
}
// indexerInformer, shareInformer
store, ctrl := cache.NewInformer(&lw, &v1.Pod{}, 0, cache.ResourceEventHandlerFuncs{
    AddFunc:    handleAddPod,
    UpdateFunc: handleUpdatePod,
    DeleteFunc: handleDeletePod,
})
stopChan := signals.SetupSignalHandler()
go ctrl.Run(stopChan)
if sync := cache.WaitForCacheSync(stopChan, ctrl.HasSynced); !sync {
    log.Println("not sync")
}
log.Println("synchronized finish")

首先,我们定义了 ListWatch 的方法,informer 会用 List 方法来获取所有的 Pod 资源,然后使用 Watch 来监听之后 Pod 资源的更新。

之后我们实例化了一个 informer。第二个参数是资源类型。第三个参数是重新同步的周期,0为不同步,否则会在每个周期开始时重新 List 所有的资源。第四个参数是 ResourceEventHandlerFuncs,这里的 AddFunc, UpdateFunc,DeleteFunc 是本地缓存在增加,更新和删除时触发的事件。

NewInformer 返回了 store 和 ctrl 两个值,store 就是 pod 的本地缓存,我们可以通过查询 store 来代替直接向 api-server 查询。这个返回的 store 实现了如下的接口:

type Store interface {
    Add(obj interface{}) error
    Update(obj interface{}) error
    Delete(obj interface{}) error
    List() []interface{}
    ListKeys() []string
    Get(obj interface{}) (item interface{}, exists bool, err error)
    GetByKey(key string) (item interface{}, exists bool, err error)

    // Replace will delete the contents of the store, using instead the
    // given list. Store takes ownership of the list, you should not reference
    // it after calling this function.
    Replace([]interface{}, string) error
    Resync() error
}

在 controller 中,我们一般使用 List*, Get* 方法,可以用来查询本地的缓存。同时不要使用其他的方法,这会导致一些不可预知的问题。

另外一个返回值 ctrl,实现了如下的接口:

type Controller interface {
    Run(stopCh <-chan struct{})
    HasSynced() bool
    LastSyncResourceVersion() string
}

这个接口很简单,Run 用来开始启动同步,stopCh 用来随时停止同步,HasSynced 用来判断同步是否完成。LastSyncResourceVersion 用来获取最新同步的资源 version。

cache.WaitForCacheSync 用来等待同步完成。

总结

关于 informer 的基本使用就先介绍这么多。后面会对 informer 中涉及的代码进行详细的分析,包括 List&Watch 的机制、DeltaFIFO 的实现、本地缓存(Store) 的实现等等。

从 iptables 看 k8s service 的实现机制

概述

k8s service 可以看做是多个 Pod 的负载均衡。有以下几种 service:

  • LoadBalancer
  • ClusterIP
  • NodePort
  • ExternalName

在 service 的演进中,从最初的 userspace 的方案变成 iptables 和 ipvs 的方案,其中,ipvs 主要是解决了 iptables 的性能问题。这篇文章主要分析 iptables 如何实现 service 的负载均衡。

ClusterIP

ClusterIP 是提供在集群中访问 Service 的方案,通常每个 Service 都会分配一个 VIP,然后为多个 Pod 提供负载均衡。这里我们创建两个副本的 nginx 部署,以及一个 nginx service。具体信息如下:

$ kubectl get endpoints nginx
NAME    ENDPOINTS                     AGE
nginx   172.17.0.4:80,172.17.0.5:80   65m

$ kubectl get service nginx
NAME    TYPE        CLUSTER-IP      EXTERNAL-IP   PORT(S)   AGE
nginx   ClusterIP   10.111.67.225   <none>        80/TCP    65m

在集群中访问 nginx.default.svc.cluster.local 时,DNS 会将这个地址解析到 Service 的 IP 上,也就是 10.111.67.225。下面我们看看 iptables 是如何将访问这个地址的流量转到真实的 Pod 上的。

首先看一下 nat 表上的 OUTPUT 链:

$ iptables -t nat -nL OUTPUT
Chain OUTPUT (policy ACCEPT)
target     prot opt source               destination
KUBE-SERVICES  all  --  0.0.0.0/0            0.0.0.0/0            /* kubernetes service portals */
DOCKER     all  --  0.0.0.0/0           !127.0.0.0/8          ADDRTYPE match dst-type LOCAL

第一条规则会匹配所有的流量,然后跳到 KUBE-SERVICES 这条链上。我们看一下 KUBE-SERVICES 的具体内容:

$ iptables -t nat -nL KUBE-SERVICES
Chain KUBE-SERVICES (2 references)
target     prot opt source               destination
KUBE-SVC-NPX46M4PTMTKRN6Y  tcp  --  0.0.0.0/0            10.96.0.1            /* default/kubernetes:https cluster IP */ tcp dpt:443
KUBE-SVC-P4Q3KNUAWJVP4ILH  tcp  --  0.0.0.0/0            10.111.67.225        /* default/nginx:http cluster IP */ tcp dpt:80
KUBE-SVC-TCOU7JCQXEZGVUNU  udp  --  0.0.0.0/0            10.96.0.10           /* kube-system/kube-dns:dns cluster IP */ udp dpt:53
KUBE-SVC-ERIFXISQEP7F7OF4  tcp  --  0.0.0.0/0            10.96.0.10           /* kube-system/kube-dns:dns-tcp cluster IP */ tcp dpt:53
KUBE-SVC-JD5MR3NA4I4DYORP  tcp  --  0.0.0.0/0            10.96.0.10           /* kube-system/kube-dns:metrics cluster IP */ tcp dpt:9153
KUBE-NODEPORTS  all  --  0.0.0.0/0            0.0.0.0/0            /* kubernetes service nodeports; NOTE: this must be the last rule in this chain */ ADDRTYPE match dst-type LOCAL

这里前面的 KUBE-SVC-* 都是根据 destination, protocol 和目的端口号来匹配的,根据我们的 service 地址和端口号以及协议,可以定位到 KUBE-SVC-P4Q3KNUAWJVP4ILH 这条规则可以匹配,然后跳到这条链上。我们接着看这条链定义了什么:

$ iptables -t nat -nL KUBE-SVC-P4Q3KNUAWJVP4ILH
Chain KUBE-SVC-P4Q3KNUAWJVP4ILH (1 references)
target     prot opt source               destination
KUBE-SEP-GL7IUDQTUTXSADHR  all  --  0.0.0.0/0            0.0.0.0/0            /* default/nginx:http */ statistic mode random probability 0.50000000000
KUBE-SEP-VMO3WCKZND6ZICDD  all  --  0.0.0.0/0            0.0.0.0/0            /* default/nginx:http */

有两条规则,根据第一条规则后面的内容,我们可以知道这就是使用 iptables 实现负载均衡的地方了。第一条规则有 50% 的匹配几率。如果匹配到了其中一条,就会跳到另外一个链上。比如:

$ iptables -t nat -nL KUBE-SEP-GL7IUDQTUTXSADHR
Chain KUBE-SEP-GL7IUDQTUTXSADHR (1 references)
target     prot opt source               destination
KUBE-MARK-MASQ  all  --  172.17.0.4           0.0.0.0/0            /* default/nginx:http */
DNAT       tcp  --  0.0.0.0/0            0.0.0.0/0            /* default/nginx:http */ tcp to:172.17.0.4:80

其中第一条规则的 source 是 Pod 的 IP,在访问 Service 时目前还不会匹配,于是我们看第二条规则,将目的 IP 和 Port 改写成 172.17.0.4:80,也就是我们的 Pod IP,这样流量就经过负载均衡指向了我们的 Pod了。

NodePort

我们将上面的 Service 改成 NodePort

nginx        NodePort    10.111.67.225   <none>        80:30000/TCP   34h

然后查询机器上的 30000 端口。

$ ss -lp | grep 30000
tcp               LISTEN              0                    0                                                                                            0.0.0.0:30000                                                 0.0.0.0:*                  users:(("kube-proxy",pid=4006,fd=8))

可以看到, kube-proxy 监听了 30000 端口,同时我们看 nat 表上的 PREROUTING 链。

KUBE-SERVICES  all  --  0.0.0.0/0            0.0.0.0/0            /* kubernetes service portals */

再看 KUBE-SERVICES

KUBE-SVC-TCOU7JCQXEZGVUNU  udp  --  0.0.0.0/0            10.96.0.10           /* kube-system/kube-dns:dns cluster IP */ udp dpt:53
KUBE-SVC-ERIFXISQEP7F7OF4  tcp  --  0.0.0.0/0            10.96.0.10           /* kube-system/kube-dns:dns-tcp cluster IP */ tcp dpt:53
KUBE-SVC-JD5MR3NA4I4DYORP  tcp  --  0.0.0.0/0            10.96.0.10           /* kube-system/kube-dns:metrics cluster IP */ tcp dpt:9153
KUBE-SVC-NPX46M4PTMTKRN6Y  tcp  --  0.0.0.0/0            10.96.0.1            /* default/kubernetes:https cluster IP */ tcp dpt:443
KUBE-SVC-P4Q3KNUAWJVP4ILH  tcp  --  0.0.0.0/0            10.111.67.225        /* default/nginx:http cluster IP */ tcp dpt:80
KUBE-NODEPORTS  all  --  0.0.0.0/0            0.0.0.0/0            /* kubernetes service nodeports; NOTE: this must be the last rule in this chain */ ADDRTYPE match dst-type LOCAL

最后一条 KUBE-NODEPORTS 可以匹配到,这里有个匹配条件,那就是 ADDRTYPE match dst-type LOCAL。注意这里的 LOCAL 指的是本机网卡上存在的地址,也就是这条数据是发到本机,那么就能匹配。

KUBE-NODEPORTS 的规则如下:

KUBE-MARK-MASQ  tcp  --  0.0.0.0/0            0.0.0.0/0            /* default/nginx:http */ tcp dpt:30000
KUBE-SVC-P4Q3KNUAWJVP4ILH  tcp  --  0.0.0.0/0            0.0.0.0/0            /* default/nginx:http */ tcp dpt:30000

第一条规则是替换源地址为本机出口的网卡地址。第二条规则如下:

KUBE-SEP-F3MS6OIYSABTYGOY  all  --  0.0.0.0/0            0.0.0.0/0            /* default/nginx:http */ statistic mode random probability 0.50000000000
KUBE-SEP-VMO3WCKZND6ZICDD  all  --  0.0.0.0/0            0.0.0.0/0            /* default/nginx:http */

这里我们在 ClusterIP 中就分析了实现方法,因此这里忽略。

LoadBalancer

LoadBalancer 本身不是由 Kubernetes 提供的,其原理说起来也不难,我们先创建一个 LoadBalancer 的 Service 看看:

nginx        LoadBalancer   10.111.67.225   <pending>     80:32014/TCP   34h

这里因为我的本地集群没有 LoadBalancer,所以一直处于 Pending 状态。但是我们可以看到,这里还有一个 80:32014。和上面的 NodePort 输出一致。也就是说创建 LoadBalancer 时,会在 Pod 所在的机器上开启 NodePort,然后由外部的 LoadBalancer 将负载均衡过的流量带到机器的指定的 NodePort 上。

一些有意思的参数

这里顺便多提几个有意思的Service 参数

externalTrafficPolicy:可选值有 LocalCluster

  • Local: 流量只会被导向本机的 Pod,这样就少一次包的转发,提高性能。但是缺点是如果容易导致负载不均衡。
  • Cluster: 在集群范围内转发流量

如果能保证 Pod 均匀的分布在不同的节点上,那么外部的 LoadBalancer 配合 Local 的 externalTrafficPolicy 可以带来更好的性能。

sessionAffinity: 会话亲和性,可以设置为 ClientIP,来达到将同一个 IP 的会话转发到相同的 Pod 上。其也是通过 iptables 实现的。

KUBE-SEP-Q7ZFI57LOFFPF3HN  all  --  0.0.0.0/0            0.0.0.0/0            /* test/nginx-session-affinity:http */ recent: CHECK seconds: 10800 reap name: KUBE-SEP-Q7ZFI57LOFFPF3HN side: source mask: 255.255.255.255
KUBE-SEP-LWUZWBNY6M3CYJ2M  all  --  0.0.0.0/0            0.0.0.0/0            /* test/nginx-session-affinity:http */ recent: CHECK seconds: 10800 reap name: KUBE-SEP-LWUZWBNY6M3CYJ2M side: source mask: 255.255.255.255
KUBE-SEP-Q7ZFI57LOFFPF3HN  all  --  0.0.0.0/0            0.0.0.0/0            /* test/nginx-session-affinity:http */ statistic mode random probability 0.50000000000
KUBE-SEP-LWUZWBNY6M3CYJ2M  all  --  0.0.0.0/0            0.0.0.0/0            /* test/nginx-session-affinity:http */

这个 iptables 的前两条规则就是在做 iptables 的检查。

ARP 协议笔记

ARP 协议是什么

在具体学习 ARP(Address Resolution Protocol) 协议之前,我们应该先了解 ARP 协议的使用场景。大多数人对 ARP 协议可能和我一样,都有一个大概的印象。比如它是在已知 IP 地址的情况下,用来查找 MAC 地址的协议。这里也试着将 wikipedia 上的定义翻译过来,给出一个较为全面准确的定义:

ARP 协议是一种通信协议,用来发现网络层地址(比如 IPv4地址)关联的链路层地址(通常是 MAC 地址)。

以下的内容都来自于 wikipedia: https://en.wikipedia.org/wiki/Address_Resolution_Protocol

ARP 报文

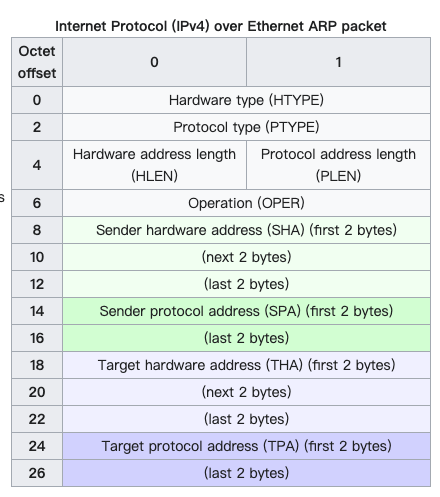
ARP 协议使用一种格式来表示地址解析的请求或响应。ARP 消息的大小取决于链路层或者网络层地址的大小。报文头指明了每一层使用的网络类型以及地址的大小。报文头以 operation code(op) 结束,code 为 1 时表示请求,为 2 时表示响应。报文内容部分由四个地址组成,分别为发送者的硬件地址(Sender hardware address,简称 SHA)、发送者的网络层地址(Sender protocol address,简称 SPA)、目标的硬件地址(Target hardware address,简称 THA)、目标的网络层地址(Target protocol address,简称 TPA)。

arp package

上图是以 IPv4 为例。这种情况下,SHA 和 THA 的大小为 48bit,SPA 和 TPA 的大小的 32bit。报文头的大小固定是 8 个字节。在 IPv4 的情况下就是总共有 28 个字节。下面,也以 IPv4 为例分别对 ARP 报文的每个字段进行解释。

1~2,Hardware type(HTYPE): 指明链路层协议类型,以太网是1。

3~4,Protocol type (PTYPE):指明网络层协议类型。对于 IPv4 来说,值是 0x0800。

5,Hardware address length(HLEN):硬件地址的长度。以太网地址的长度是6。

6,Protocol length(PLEN):网络层地址的长度。IPv4 地址长度是 4。

7~8,Operation(OP):指明发送方执行的操作,1是请求,2是响应。

到此,ARP 的报文头结束。

9~14,Sender hardware address(SHA):发送方的 MAC 地址。在 ARP 请求中,它代表的是发送请求方的地址。在 ARP 响应中,它代表的是这次 ARP 请求查找的主机地址。

15~18,Sender protocol address(SPA):发送方的网络层地址。

19~24,Target hardware address(THA):接收方的 MAC 地址。在 ARP 请求中,这个字段是被忽略的。在 ARP 响应中,这个字段用来表示 ARP 请求源主机的地址。

25~28,Target protocol address(TPA):接收方的网络层地址。

ARP 的以太网帧类型是 0x0806。

例子

在一个办公室中的两台电脑 c1(192.168.1.100) 和 c2(192.168.1.101) ,在局域网内通过以太网接口和交换机连接,中间没有网关和路由器。

下面我通过 linux 的网桥和 network namespace 来模拟这一场景:

# 准备交换机
ip link add name switch type bridge
# 准备一根网线,一头连接电脑c1,一头连接交换机
ip link add name veth_c10 type veth peer name veth_c11
# 准备一根网线,一头连接电脑c1,一头连接交换机
ip link add name veth_c20 type veth peer name veth_c21
# 准备电脑c1
ip netns add c1
# 准备电脑c2
ip netns add c2
# 将网线插入 c1
ip link set veth_c11 netns c1
# 将网线插入 c2
ip link set veth_c21 netns c2
# 将两根网线都插到交换机
ip link set veth_c10 master switch
ip link set veth_c20 master switch
# 启动交换机
ip link set switch up
# 启动c1
ip link set veth_c10 up
# 启动c2
ip link set veth_c20 up
# 为c1和c2分配ip
ip netns exec c1 ip addr add 192.168.1.100/24 dev veth_c11
ip netns exec c2 ip addr add 192.168.1.101/24 dev veth_c21
ip netns exec c1 ip link set veth_c11 up
ip netns exec c2 ip link set veth_c21 up

环境准备好了之后,c1 想要跟 c2 通信,此时 c1 需要知道 c2 的 MAC 地址。首先它会查找本地是否有缓存的 ARP 表。因为我们的环境刚刚创建好,所以肯定是没有缓存的,那么这个时候,c1 就会发送 ARP 请求,来查找 c2 的 MAC 地址。为了看到 c1 和 c2 之间的所有通信,我们可以用 tcpdump 或 wireshark 来抓交换机上的包,我这里为了展示的更清晰,采用 wireshark 来抓包。

从 c1 向 c2 发送一次 ping。

ip netns exec c1 ping -c 1 192.168.1.101

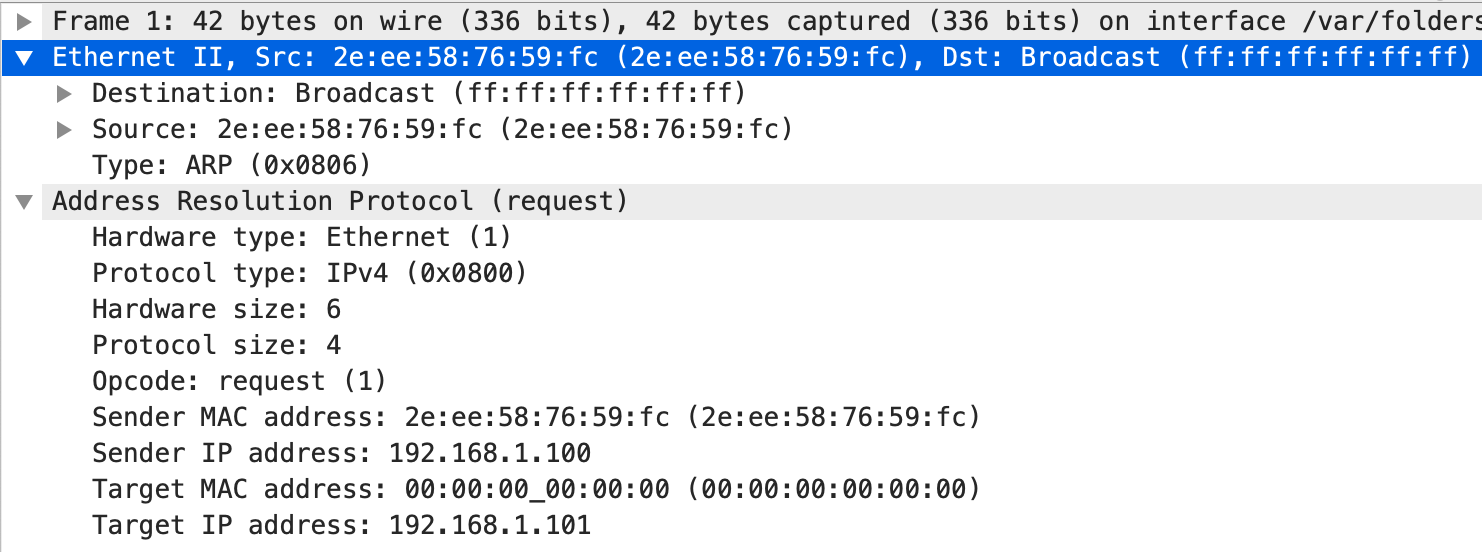
wireshark 抓包截图如下:

wireshark

第一条是 ARP 请求。它是封装在以太网帧中的。

arp request

以太网帧的广播地址是 ff:ff:ff:ff:ff:ff,源地址是 2e:ee:58:76:59:fc。类型是 ARP。ARP 请求中因为不知道目标的 MAC 地址,所以是 00:00:00:00:00:00。十六进制表示如下:

arp request hex

ARP 响应报文如下:

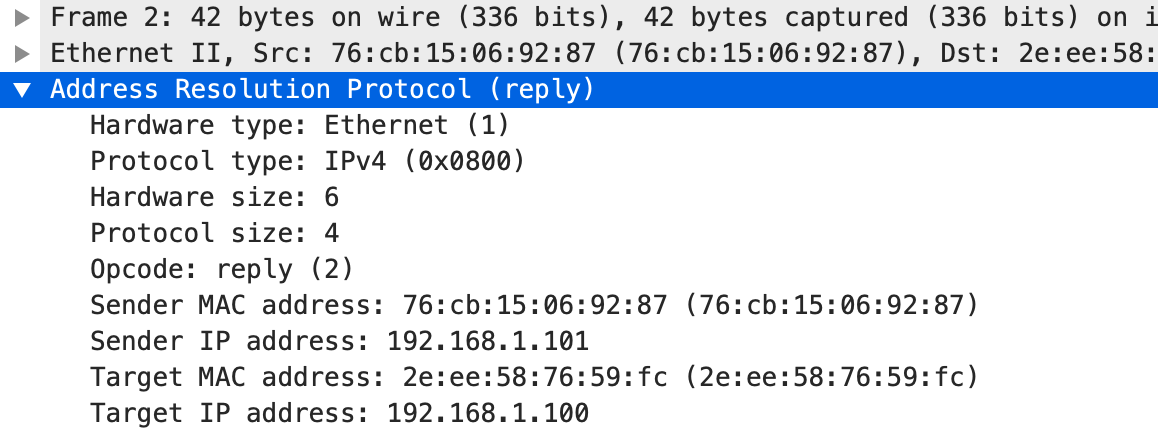
arp reply。通过这个响应我们也能知道 c1 的 MAC 地址是 2e:ee:58:76:59:fc,c2 的 MAC 地址是 76:cb:15:06:92:87。这个时候,我们也可以看一下 arp 表的情况。

ip netns exec c1 arp -a
? (192.168.1.101) at 76:cb:15:06:92:87 [ether] on veth_c11

ARP 探针(ARP probe)

ARP 探针是一种 SPA 全为 0 的请求。在使用一个 IPv4 地址之前,实现了这个规范的主机必须检查这个地址是否已经在使用了。就是通过这样一个请求来检查的。

为什么要 SPA 全为 0 呢?这是为了防止如果存在冲突,这个请求可能会污染其他主机的 arp 表。

ARP 通告(ARP announcements)

ARP 可以用来作为一种简单的通告协议。当发送方的 IP 地址或者 MAC 地址发生改变后,用来更新其他主机的 MAC 表映射。ARP 通告请求在 target 字段上包含了 SPA 的值(TPA=SPA),THA 为 0,然后广播出去。因为 TPA 为自己的网络层地址,所以不会有其他主机的 ARP 响应。但是其他主机都会收到发送方的 MAC 地址和 IP 地址,那么就可以更新自己的缓存。

ARP 欺骗(ARP spoofing)和 代理 ARP(proxy ARP)

ARP 欺骗很好理解,就是让 ARP 请求的发送方收到错误的 ARP 响应。比如现在我们有三台电脑:

  • c1: 192.168.1.100(2e:ee:58:76:59:fc)
  • c2: 192.168.1.101(76:cb:15:06:92:87)
  • c3: 192.168.1.102(12:07:6b:be:20:d2)

c1 想给 c2 发送数据,在 c1 发 ARP 请求的时候,我们将 ARP 响应中 c2 的 MAC 地址改为 c3 的 MAC地址。然后 c1 的数据就都会发给 c3 了,但是 c1 仍然认为自己在和 c2 通信,这就是 ARP 欺骗了。

代理 ARP 和 ARP 欺骗很像,只是目的不太一样。代理 ARP 的使用场景一般是两台主机不在同一个二层网内,这样通过代理 ARP 的方式来做流量转发。