概述
作为一个经常写 go 的程序员,肯定时不时会看到 go 的 panic 信息。一般我们都可以根据信息轻松定位到出错的代码行数,但也因为这个原因,往往忽视了其他的一些信息。这篇文章主要来分析,go 程序 panic 时输出的错误信息到底如何理解?
例子分析
下面我们先用一个非常简单的例子来说明:
package main

import (
    "fmt"
)

type Person struct {
    name string
    age  int
}

func (person *Person) say(words []string) (ret int) {
    for i := range words {
        ret++
        fmt.Printf("%s say: %s", person.name, words[i])
    }
    return
}

func main() {
    var person *Person
    words := []string{
        "hello",
        "world",
    }
    person.say(words)
}
这个例子一运行就会 panic,信息如下:
panic: runtime error: invalid memory address or nil pointer dereference
[signal SIGSEGV: segmentation violation code=0x1 addr=0x8 pc=0x493373]

goroutine 1 [running]:
main.(*Person).say(0x0, 0xc000072f58, 0x2, 0x2, 0x0)
    /home/jiangpengfei.jiangpf/projects/panic_demo/main.go:15 +0x43
main.main()
    /home/jiangpengfei.jiangpf/projects/panic_demo/main.go:26 +0x7d
panic: runtime error: invalid memory address or nil pointer dereference。这句话表面了这是一个 panic 异常,并且可能原因是无效的内存地址或空指针的解引用-
[signal SIGSEGV: segmentation violation code=0x1 addr=0x8 pc=0x493373]。SIGSEGV当一个进程执行了一个无效的内存引用,或发生段错误时发送给它的信号。0x1对应的是SEGV_MAPERR,也就是指地址未找到对象。addr是0x8,这并不是一个有效的内存地址。pc是程序计数器,用来指向下一条指令存放的位置。 -
goroutine 1 [running]。1是 goroutine 的 ID。running代表该协程在发生异常时的状态。 -
main.(*Person).say(0x0, 0xc000072f58, 0x2, 0x2, 0x0)。main是 package,(*Person)是类型,say是方法,我们可以看到,say 的调用共有 5 的参数。但代码中,say 的调用其实只有 1 个参数。其实呢,- 第 1 参数是 receiver,这里就是
*Person。值为0x0说明它是一个空指针。 - 第2~4个参数是
[]string,我们都知道,slice 这个数据结构是有三个字段组成:pointer, len, cap。pointer(0xc000072f58) 是指向实际内存地址的指针,len(0x2) 是长度,cap(0x2) 是容量。 - 第 5 个参数是返回值。
- 第 1 参数是 receiver,这里就是
/home/jiangpengfei.jiangpf/projects/panic_demo/main.go:14 +0x43。这里标出了出错的代码位置以及行号。+0x43又代表什么含义呢?说实话我没有搜索到相关的信息。但是找到了如下的 go runtime 的代码[go/src/runtime/traceback.go:439]。frame 代表当前栈帧,f 代表当前函数,entry 是该函数的 start pc。因此可以知道+0x43代表的是栈内的 pc 偏移量。if frame.pc > f.entry { print(" +", hex(frame.pc-f.entry)) }
至此,一个简单的 panic 例子分析完毕。但是这里我们还有两个没有说明白的事情。
- panic 时的参数到底如何分析,比如上面说到 slice 类型的参数在 panic 时,会输出 pointer, len, cap 这三个信息。其实也就是,panic 中会输出 go 类型的内存布局信息。那么对于其他的类型又是什么样子的呢?
- panic 时,go runtime 是如何做到收集并打印出上述的所有信息呢?
go 类型的内存布局
这一部分主要参考:Go Data Structures 和 Go Data Structures: Interfaces。大家也可以直接看这两篇文章。
基本类型
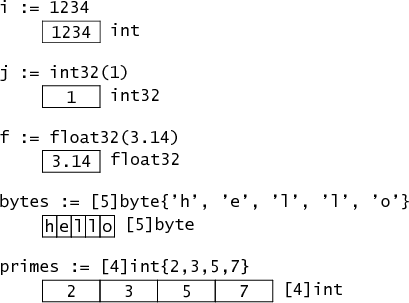
基本类型的内存布局很好理解,不多阐述。
结构体和指针
结构体的内存布局是按照成员变量的顺序来的。当然,还会有一些内存对齐的优化,不过不属于本篇文章的范围。
比如下面的 Point 结构体。
type Point struct { X, Y int }
其内存布局如下:。
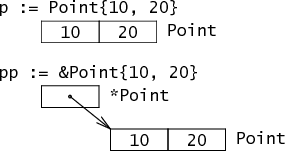
对于成员变量非基本类型,内存布局如下:
type Rect1 struct { Min, Max Point }
type Rect2 struct { Min, Max *Point }

字符串
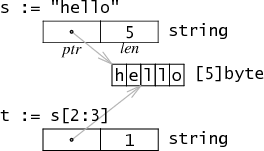
字符串主要由:pointer 和 len 组成,其中 pointer 指向 byte 数组的内存首地址。同时,go 中的 string 是不可变的,因此多个字符串共享同一块内存区域是安全的。
切片
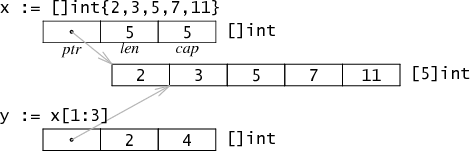
slice 也是引用到数组的一块内存地址上,由三个字段组成:pointer, len 和 cap
interface
(下面是基于 32 位机器而言)
type Stringer interface {
    String() string
}

func ToString(any interface{}) string {
    if v, ok := any.(Stringer); ok {
        return v.String()
    }
    switch v := any.(type) {
    case int:
        return strconv.Itoa(v)
    case float:
        return strconv.Ftoa(v, 'g', -1)
    }
    return "???"
}
type Binary uint64

func (i Binary) String() string {
    return strconv.Uitob64(i.Get(), 2)
}

func (i Binary) Get() uint64 {
    return uint64(i)
}
上面定义了 Stringer 类型,Binary 实现了 Stringer 类型。
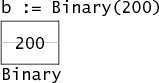
那么,图中 b 的内存布局如下。将 b 做类型转换成 s 后,内存布局如下:
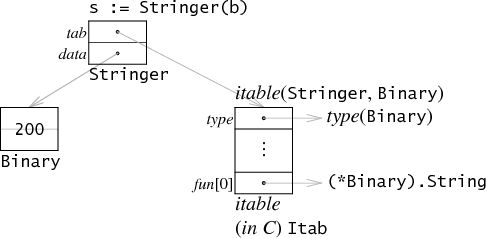
这里,tab 指向了一个 itable
- itable 中的 type 指向了底层类型(Binary),因此 s.tab->type 就可以获取该 interface 的类型。
- itable 的 func 数组中只保存实现了 Stringer 的方法指针。所以 Get() 并不会保存在这里。
- 在调用 s.String() 时,等同于调用
s.tab->func[0](s.data)。将 s.data 作为第一个参数,传进函数调用中。这里还需要注意一点,因为函数调用传进去的是 s.data,而 s.data 的类型是 *Binary。因此 func[0] 是(*Binary).String而不是(Binary).String。
data 是一个指针,指向了 Binary(200)。需要注意的是,这里并不是指向了原始的 b,而是 b 的拷贝。
当然,并不是所有情况都如此,比如说,如果将 b 转换成一个没有方法的 interface,这里就可以对内存做一下优化。
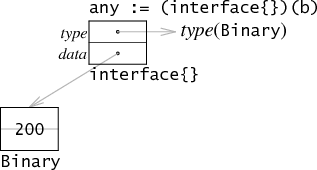
此时,因为没有 func 列表,所以就不要单独为 itable 在堆上分配一块内存了。any.type 直接指向一个类型就可以了。同样的,如果 data 正好是 32位(和机器的寻址大小一致),那么也可以通过直接将值保存在 data 中来进行优化。
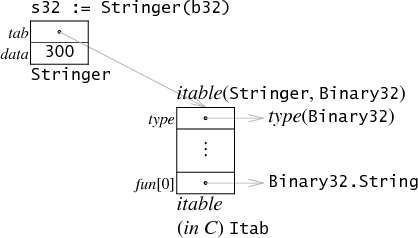
下面是两种优化都可以享受的情况:

参数更多的例子分析
在了解到上述的 go 类型的内存布局之后,下面看一个更多参数的函数调用 panic。
package main

//go:noinline
func test1(a int, b []int, c string, d [2]int64) error {
    panic("test1")
}

func main() {
    a := 0
    b := make([]int, 3, 7)
    b[0], b[1], b[2] = 1, 2, 3
    c := "c"
    d := [2]int64{5, 6}

    test1(a, b, c, d)
}
注意,这里使用了 //go:noinline 来防止 go 编译时对函数进行内联,这样 panic 后就会丢失参数信息。panic 信息如下:
main.test1(0x0, 0xc00003a740, 0x3, 0x7, 0x475848, 0x1, 0x5, 0x6, 0x4046eb, 0xc000058000)
解释如下:
main.test1(0x0, // a 的值
           0xc00003a710, // b 指向的内存地址
           0x3, // b 的 len
           0x7, // b 的 cap
           0x475a48, // c 指向的内存地址
           0x1, // c 的长度
           0x5, // d[0]
           0x6, // d[1]
           0x4046eb, //
           0xc000058000) // error 的值
如果我们希望看到没有优化过的 error 值。可以使用下面的方式来运行:
go run -gcflags '-N -l' main.go
这样的话,最后两个参数就都是 0x0。再来一个和结构体相关的例子:
package main

type speaker interface {
    say()
}

type person struct {
    name string
    age  int
}

func (p person) say() {
}

//go:noinline
func test2(p1 person, p2 *person, p3 speaker) error {
    panic("test2")
    return nil
}

func main() {
    p1 := person{"p", 11}
    p2 := new(person)
    p3 := speaker(p1)

    test2(p1, p2, p3)
}
使用 go run -gcflags '-N -l' main.go 运行后 panic 信息如下:
main.test2(0x475a48, 0x1, 0xb, 0xc00003a748, 0x487200, 0xc00003a730, 0x0, 0x0)
解释如下:
main.test2(0x475a49, // person.name 指向的内存地址
           0x1, // person.name 的长度
           0xb, // person.age 的值
           0xc00003a748, // p2 的指针值
           0x487200, // p3 指向的 itable 中的 type
           0xc00003a730, // p3 指向的 p1 的拷贝的内存地址
           0x0, // error 的类型
           0x0) // error 的值
go panic 后的执行过程
goroutine 上发生 panic 后,会进入函数退出阶段。以手动调用 panic 为例。
- 首先,go runtime 会将该 panic 放到 goroutine 的 panic 链表首。
var p _panic
p.arg = e       // arg 是 panic 的参数
p.link = gp._panic // link 指向更早的 panic
gp._panic = (*_panic)(noescape(unsafe.Pointer(&p))) // gp 是当前 goroutine 协程
- 接着,会依次执行 goroutine 上的 defer。
for { d := gp._defer if d == nil { break } ... ... } - 如果该 defer 之前已经执行过了。则直接忽略该 defer
// If defer was started by earlier panic or Goexit (and, since we're back here, that triggered a new panic), // take defer off list. The earlier panic or Goexit will not continue running. if d.started { if d._panic != nil { d._panic.aborted = true } d._panic = nil d.fn = nil gp._defer = d.link freedefer(d) continue } - 执行 defer 对应的函数调用。
reflectcall(nil, unsafe.Pointer(d.fn), deferArgs(d), uint32(d.siz), uint32(d.siz)) - 如果 defer 函数中遇到了 recover(),还会执行以下代码。当然,这里只会检查 recover() 调用是否有效
- p != nil。当前确实发生 panic 了。
- !p.recovered。当前的 panic 没有恢复
- argp uintptr(p.argp)。argp 是调用者的参数指针,p.argp 是 defer 的参数。
- 如果上述条件之一不满足,就返回 nil,表示这个 recover() 是无效的。
func gorecover(argp uintptr) interface{} { // Must be in a function running as part of a deferred call during the panic. // Must be called from the topmost function of the call // (the function used in the defer statement). // p.argp is the argument pointer of that topmost deferred function call. // Compare against argp reported by caller. // If they match, the caller is the one who can recover. gp := getg() p := gp._panic if p != nil && !p.recovered && argp == uintptr(p.argp) { p.recovered = true return p.arg } return nil } - 上一步虽然是 recover() 调用,但并没有 recover 的逻辑,只是给当前 panic 标记了 recovered=true。所以可以执行到下面这个判断。通过
mcall(recovery)来执行真正的恢复逻辑。if p.recovered { atomic.Xadd(&runningPanicDefers, -1) gp._panic = p.link // Aborted panics are marked but remain on the g.panic list. // Remove them from the list. for gp._panic != nil && gp._panic.aborted { gp._panic = gp._panic.link } if gp._panic == nil { // must be done with signal gp.sig = 0 } // Pass information about recovering frame to recovery. gp.sigcode0 = uintptr(sp) gp.sigcode1 = pc mcall(recovery) throw("recovery failed") // mcall should not return } - 恢复实现如下
// Unwind the stack after a deferred function calls recover // after a panic. Then arrange to continue running as though // the caller of the deferred function returned normally. func recovery(gp *g) { // Info about defer passed in G struct. sp := gp.sigcode0 pc := gp.sigcode1 // d's arguments need to be in the stack. if sp != 0 && (sp < gp.stack.lo || gp.stack.hi < sp) { print("recover: ", hex(sp), " not in [", hex(gp.stack.lo), ", ", hex(gp.stack.hi), "]\n") throw("bad recovery") } // Make the deferproc for this d return again, // this time returning 1. The calling function will // jump to the standard return epilogue. gp.sched.sp = sp gp.sched.pc = pc gp.sched.lr = 0 gp.sched.ret = 1 gogo(&gp.sched) } - 如果没有恢复逻辑的话,就执行到输出异常信息的地方了。
// ran out of deferred calls - old-school panic now // Because it is unsafe to call arbitrary user code after freezing // the world, we call preprintpanics to invoke all necessary Error // and String methods to prepare the panic strings before startpanic. preprintpanics(gp._panic) fatalpanic(gp._panic) // should not return preprintpanics负责准备要打印的信息。即如果 panic 参数是 error,就从 v.Error() 中获取错误信息。如果参数实现了 stringer,则调用 String() 来获取字符串信息。// Call all Error and String methods before freezing the world. // Used when crashing with panicking. func preprintpanics(p *_panic) { defer func() { if recover() != nil { throw("panic while printing panic value") } }() for p != nil { switch v := p.arg.(type) { case error: p.arg = v.Error() case stringer: p.arg = v.String() } p = p.link } }fatalpanic开始最后的异常信息输出。首先递归调用printpanics来打印 panic 的参数。// Print all currently active panics. Used when crashing. // Should only be called after preprintpanics. func printpanics(p *_panic) { if p.link != nil { printpanics(p.link) print("\t") } print("panic: ") printany(p.arg) if p.recovered { print(" [recovered]") } print("\n") }-
最后调用
dopanic_m来打印异常调用栈,然后exit(2)退出